Multipart Forms with Vue and Pinia

Multipart forms are a way to get different data in an organized manner. They make collecting various information from users easier and more flexible. However, building such forms can be tough because you must collect every data in each form and store it in an organized way before proceeding to the next form. Luckily, Vue and Pinia help build good, easy multipart forms for users, as this article shows.

Discover how at OpenReplay.com.
Vue.js is a Javascript framework for building web applications. Forms for collecting data from users can be built with this framework.
Pinia is a state management library designed for Vue applications. It allows you to store data in a single store and share that data across components/pages. This library will collect all the data submitted by the user and store it in a single state for easy accessibility.
Vue and Pinia build multipart forms with ease while keeping the codebase clean and maintainable.
Setting up Vue and Pinia
Before creating our multipart form, we need to set up our development environment. This involves installing vue.js and integrating pinia into our project.
In this introductory section, we’ll set up vue.js and integrate pinia. Once we have everything set up, we’ll be ready to start building our multipart form!
Code walkthrough for initializing a new Vue project
Now, let’s set up the Vue project. We’ll go through the steps to start a new Vue project using the Vue CLI (Command Line Interface). Here’s how:
- Install Vue CLI: Open your terminal or command prompt and type in:
npm install -g @vue/cli- Create a New Vue Project: Navigate to the folder where you want to create your project and type:
vue create my-vue-projectReplace my-vue-project with the name you want to give your project. Press enter and follow the prompts to choose how to set it up.
-
Set Up Your Project: Vue CLI will set up your project. It will download all the necessary files and install dependencies.
-
Go to Your Project Folder: Once the setup is done, navigate to your project folder. You can do this by typing:
cd my-vue-project- Start the Development Server: Type the following command to start the server
npm run serveThis command starts a development server for your Vue project. You’ll see a URL where you can access your Vue application.
Setting up Pinia for efficient state management
Now, let’s integrate pinia into our vue project to manage our application’s state smoothly. Here’s how to do it in simple steps:
- Install Pinia: We start by installing
piniaand its dependencies. Open your terminal or command prompt, make sure you’re in your project directory, and type:
npm install pinia- Integrate Pinia into Vue: Look for the main JavaScript file of your vue app. It’s typically named
main.js. Import theApp.vuecomponent, and also importcreatePiniafrompinia. This function is used to create apiniastore instance. Initialize yourvueapplication with vue’screateApp()function. Pass in theApp.vuecomponent as an argument and tell yourvueapp to usecreatePiniaby usingapp.use(createPinia()). This makespiniaavailable to all components in the app. Finally, specify where yourvueapp should appear in yourHTMLdocument usingapp.mount('#app').
//main.js
import { createApp } from 'vue'
import { createPinia } from 'pinia'
import App from './App.vue'

const app = createApp(App)

app.use(createPinia())

app.mount('#app')
This integrates pinia into your vue application, allowing all components to access it.
- Using Pinia Store: Now, you can define modules within your
store.jsfile to manage different aspects of your application’s state.
Designing the Form structure
In this phase, we’re focusing on designing the structure of our form for our vue.js and pinia multipart form projects.
We’ll cover the basics of form design, including input fields, labels, validation, and layout. With vue.js, we’ll make our form dynamic, responding to user input in real time. Pinia will help us manage the form’s state consistently across different sections.
Designing the form components
We will build a simple form to collect information from business owners. To keep things organized and easy to fill out, we will split the form into three parts: personal info, business info, and kyc (know your customer) details.
Using vue.js, we’ll make each part of the form dynamic and engaging.
Inside the vue project directory, create a component folder in the src folder, then create three files for three different components:
PersonalInfo.vueBusinessInfo.vueKycDetails.vue
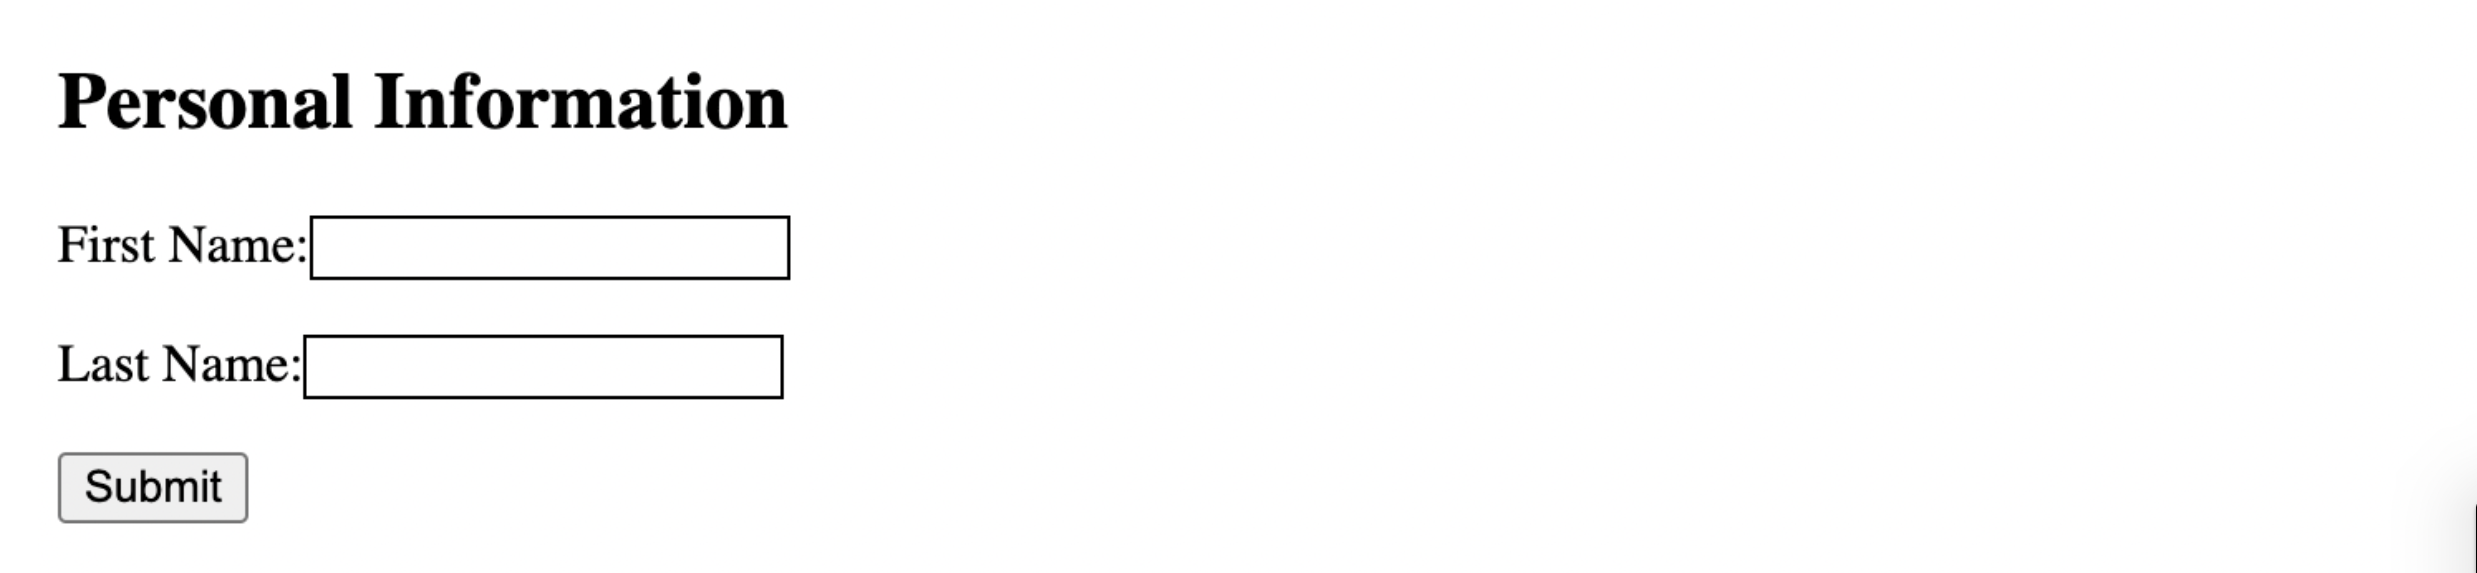
In the PersonalInfo.vue component, we will create a simple form where the business owner can share their first name and last name:
// PersonalInfo.vue
<template>
  <div>
    <h2>Personal Information</h2>
    <form>
      <div>
        <label for="firstName">First Name:</label>
        <input type="text" id="firstName" v-model="firstName" />
      </div>
      <div>
        <label for="lastName">Last Name:</label>
        <input type="text" id="lastName" v-model="lastName" />
      </div>

      <button type="submit">Submit</button>
    </form>
  </div>
</template>

<script setup>
import { ref } from 'vue'

const firstName = ref('')
const lastName = ref('')
</script>
In the BusinessInfo.vue component, we will create another form that allows the user to share more information about the business:
//BusinessInfo.vue
<template>
  <div>
    <h2>Business Information</h2>
    <form>
      <div>
        <label for="businessName">Business Name:</label>
        <input type="text" id="businessName" v-model="businessName" />
      </div>
      <div>
        <label for="businessType">Business Type:</label>
        <input type="text" id="businessType" v-model="businessType" />
      </div>
      <button type="submit">Submit</button>
    </form>
  </div>
</template>

<script setup>
import { ref } from 'vue'

const businessName = ref('')
const businessType = ref('')
</script>
In the KycDetails.vue, we will create another form that collects more legal information about the business owner:
//KycDetails.vue
<template>
  <div>
    <h2>KYC Details</h2>
    <form>
      <div>
        <label for="identificationNumber">Identification Number:</label>
        <input type="text" id="identificationNumber" v-model="identificationNumber" />
      </div>
      <div>
        <label for="issueDate">Issue Date:</label>
        <input type="date" id="issueDate" v-model="issueDate" />
      </div>
      <button type="submit">Submit</button>
    </form>
  </div>
</template>

<script setup>
import { ref } from 'vue'

const identificationNumber = ref('')
const issueDate = ref('')
</script>
To display the components on the browser, we will import them into the App.vue file:
//App.vue
<template>
  <div id="app">
    <PersonalInfo />
    <BusinessInfo />
    <KycDetails />
  </div>
</template>

<script setup>
import PersonalInfo from '@/components/PersonalInfo.vue';
import BusinessInfo from '@/components/BusinessInfo.vue';
import KycDetails from '@/components/KycDetails.vue';
</script>

<style>
/* Add styles here if needed */
div {
  margin-bottom: 1rem;
}
input {
  border: 1px solid;
}
.previous {
  margin-left: 1rem;
}
</style>
AA multiform cannot display all the forms at once, so we will show them one at a time. The business owner has to complete each form to see the next one, and he can also go back to the previous form to edit the information in case of a mistake.
This will be done by creating a previous button in the BusinessInfo.vue and the KycDetails.vue components. These components will be shown with “conditional rendering” in vue and an event will be emitted from these components to App.vue to tell the browser which form to show. The illustration is below:
First, we will create a variable called currentForm in the App.vue file, then we will use conditional rendering with v-if to display the active component which is the component that the business owner is currently filling:
//App.vue
<template>
  <div id="app">
    <PersonalInfo v-if="currentForm === 1"/>
    <BusinessInfo v-if="currentForm === 2"/>
    <KycDetails v-if="currentForm === 3"/>
  </div>
</template>

<script setup>
import { ref } from 'vue'
import PersonalInfo from '@/components/PersonalInfo.vue';
import BusinessInfo from '@/components/BusinessInfo.vue';
import KycDetails from '@/components/KycDetails.vue';

const currentForm = ref(1)
</script>

<style>
/* Add your styles here if needed */
div {
  margin-bottom: 1rem;
}
input {
  border: 1px solid;
}
.previous {
  margin-left: 1rem;
}
</style>
The active component that will be shown when the DOM is mounted after conditional rendering has been applied in the App.vue component is the PersonalInfo.vue component:
Now we will emit an event through a function called handleSubmit function and a vue property called defineEmits in each of these components to inform the browser which form the business owner has completed and the next form he is supposed to fill.
In the PersonalInfo.vue component, we emit an event called update:currentForm. When the form is filled, and the user clicks the submit button, then an event is emitted which updates the currentForm to 2 and tells the browser that the PersonalInfo.vue is filled, and it should display the next form, which is the BusinessInfo.vue form.
//PersonalInfo.vue
<template>
  <div>
    <h2>Personal Information</h2>
    <form @submit.prevent="handleSubmit">
      <div>
        <label for="firstName">First Name:</label>
        <input type="text" id="firstName" v-model="firstName" />
      </div>
      <div>
        <label for="lastName">Last Name:</label>
        <input type="text" id="lastName" v-model="lastName" />
      </div>
      <button type="submit">Submit</button>
    </form>
  </div>
</template>

<script setup>
import { ref } from 'vue'

const emit = defineEmits(['update:currentForm'])
const firstName = ref('')
const lastName = ref('')

const handleSubmit = () => {
  // Emit event to notify parent component to move to the next form section
  emit('update:currentForm', 2)
}
</script>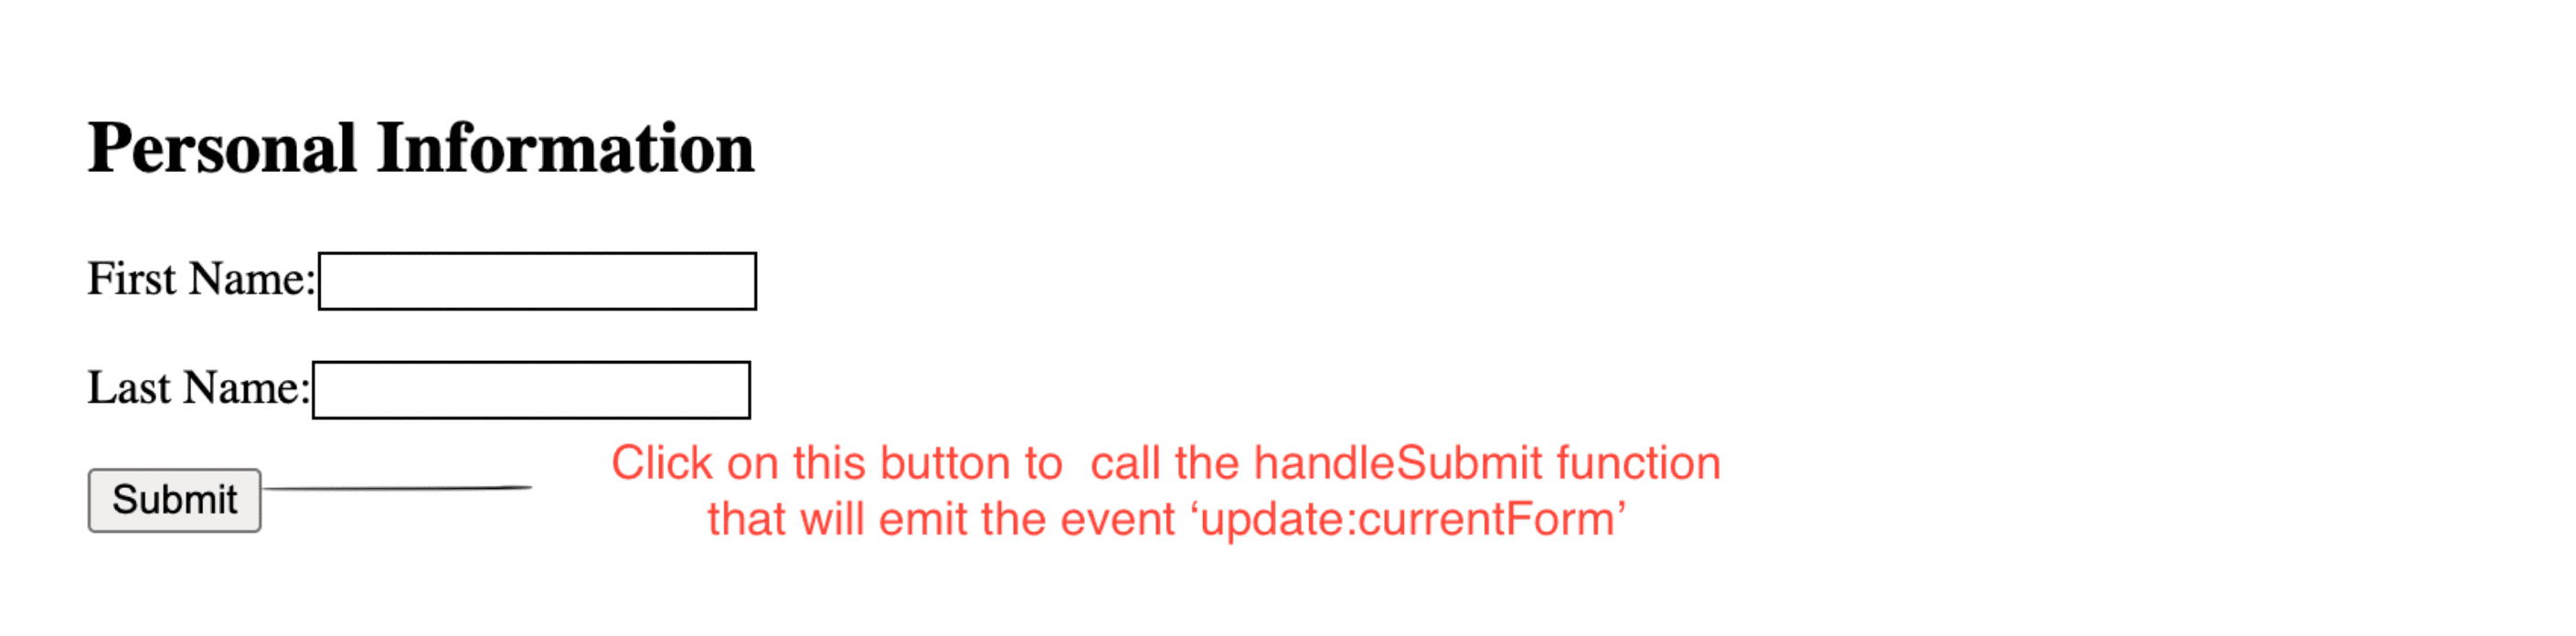
In the BusinessInfo.vue component, we will create another button called the Previous button in cases where the user wants to see the previous form and make changes to the form. This button will call a function goToPreviousForm that will emit an event update:currentForm. This event changes the currentForm to 1 informing the browser that the businessOwner wants to see the previous form.
If the BusinessInfo form is filled and the user clicks on the submit button, an event is emitted which updates the currentForm to 3 and tells the browser that the BusinessInfo.vue is filled and it should display the next form which is the KycDetails.vue form.
//BusinessInfo.vue
<template>
  <div>
    <h2>Business Information</h2>
    <form @submit.prevent="handleSubmit">
      <div>
        <label for="businessName">Business Name:</label>
        <input type="text" id="businessName" v-model="businessName" />
      </div>
      <div>
        <label for="businessType">Business Type:</label>
        <input type="text" id="businessType" v-model="businessType" />
      </div>
      <button type="submit">Submit</button>
      <button class='previous' @click="goToPreviousForm" type="button">Previous</button>
    </form>
  </div>
</template>

<script setup>
import { ref } from 'vue'

const emit = defineEmits(['update:currentForm'])
const businessName = ref('')
const businessType = ref('')

const handleSubmit = () => {
  // Emit event to notify parent component to move to the next form section
  emit('update:currentForm', 3)
}

const goToPreviousForm = () => {
  // Emit event to notify parent component to move to the  previous form section
  emit('update:currentForm', 1)
}
</script>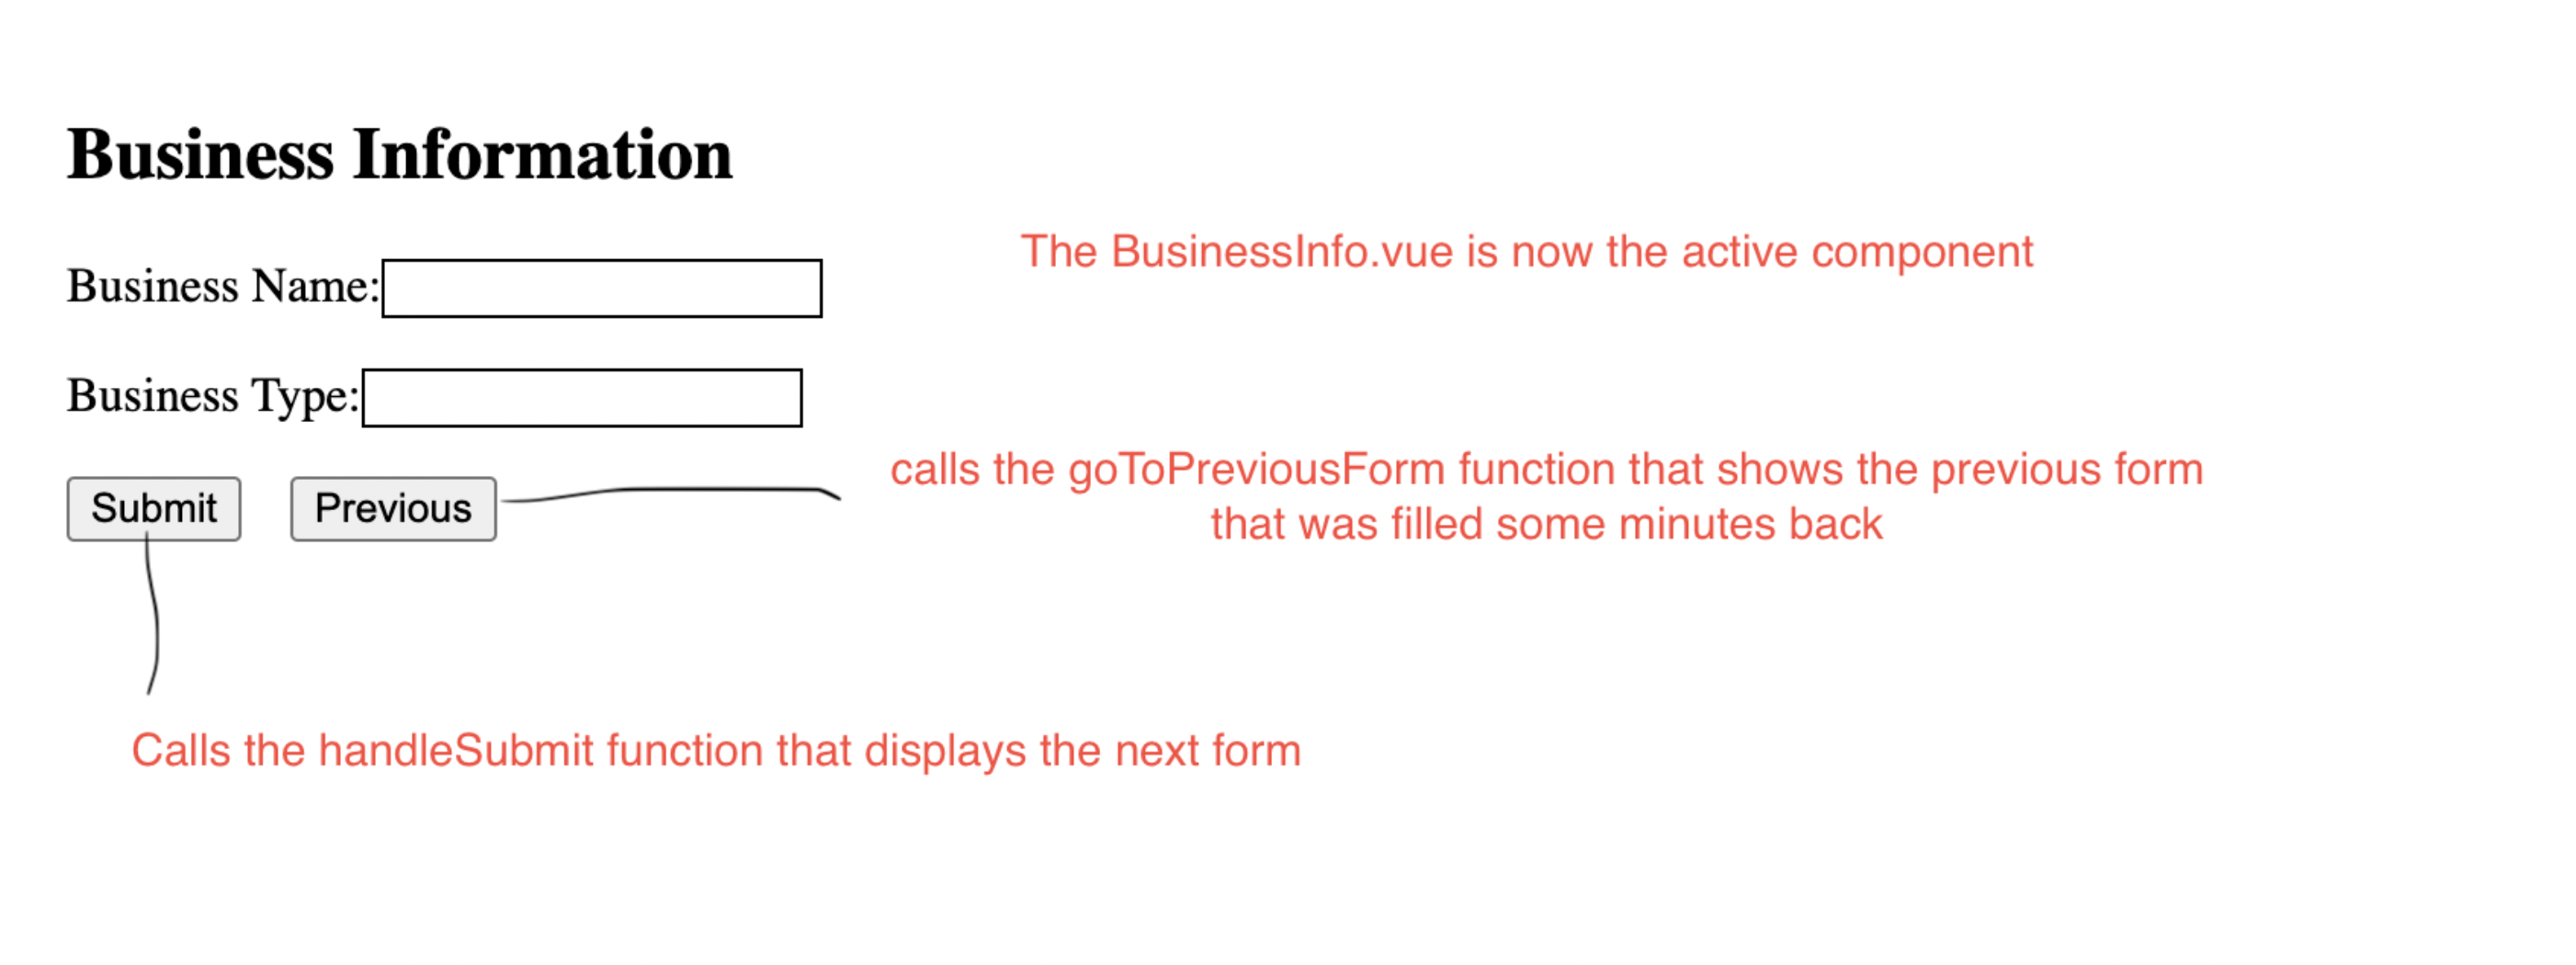
In the KycDetails.vue component, we will create another button called the Previous button in cases where the user wants to see the previous form and make changes to the form. This button will call a function goToPreviousForm that will emit an event update:currentForm. This event changes the currentForm to 2 informing the browser that the business owner wants to see the previous form.
After filling the KycDetails.vue component, the business owner has filled the three forms and he can only go back to the previous form or he can submit the details which will be handled later.
//KycDetails.vue
<template>
  <div>
    <h2>KYC Details</h2>
    <form @submit.prevent="handleSubmit">
      <div>
        <label for="identificationNumber">Identification Number:</label>
        <input type="text" id="identificationNumber" v-model="identificationNumber" />
      </div>
      <div>
        <label for="issueDate">Issue Date:</label>
        <input type="date" id="issueDate" v-model="issueDate" />
      </div>
      <button type="submit">Submit</button>
      <button class='previous' @click="goToPreviousForm" type="button">Previous</button>
    </form>
  </div>
</template>

<script setup>
import { ref } from 'vue'

const emit = defineEmits(['update:currentForm'])
const identificationNumber = ref('')
const issueDate = ref('')

const handleSubmit = () => {
  // this will be handled later
  console.log('Submission completed')
}

const goToPreviousForm = () => {
  // Emit event to notify parent component to move to   the previous form section
  emit('update:currentForm', 2)
}
</script>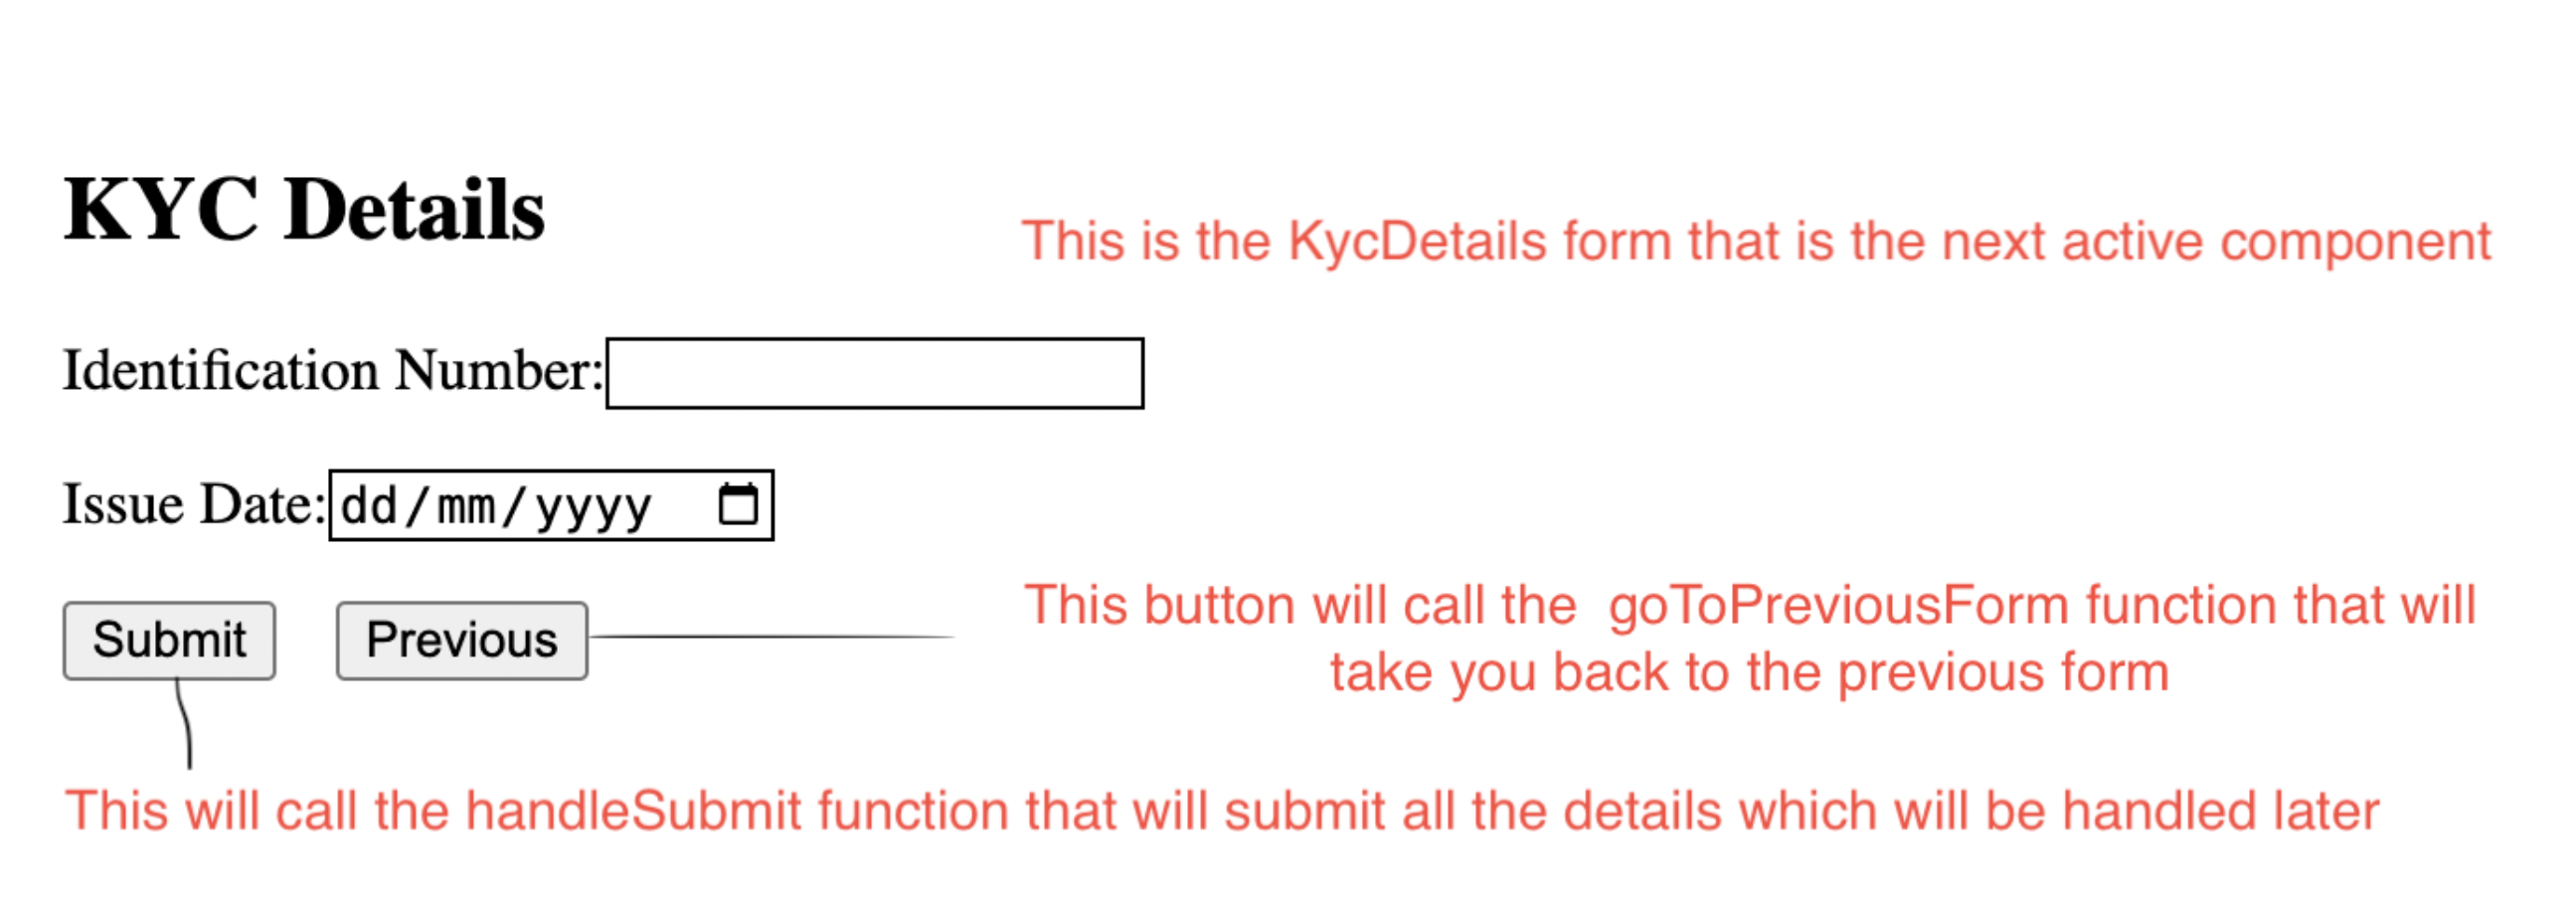
Now, we will call these emit functions in the parent component(App.vue) with the updateCurrentForm function to tell the browser which form is active:
//App.vue
<template>
  <div id="app">
    <PersonalInfo @update:currentForm="updateCurrentForm($event)" v-if="currentForm === 1" />
    <BusinessInfo @update:currentForm="updateCurrentForm($event)" v-if="currentForm === 2" />
    <KycDetails @update:currentForm="updateCurrentForm($event)" v-if="currentForm === 3" />
  </div>
</template>

<script setup>
import { ref } from 'vue'
import PersonalInfo from '@/components/PersonalInfo.vue';
import BusinessInfo from '@/components/BusinessInfo.vue';
import KycDetails from '@/components/KycDetails.vue';

const currentForm = ref(1)

const updateCurrentForm = (value) => {
  currentForm.value = value
}
</script>

<style>
/* Add your styles here if needed */
div {
  margin-bottom: 1rem;
}
input {
  border: 1px solid;
}
.previous {
  margin-left: 1rem;
}
</style>Submitting form data to Pinia store in batches
Now we will send the data collected from the business owner in groups to the pinia store.
Batch submission means we’re packaging data together, just like sending parcels instead of individual items. It’s quicker and more organized.
Create a folder in your project src directory called store, then create a file called FormDataStore.js. Inside this file, we will create an object to collect the business owner data.
//FormDataStore.js
import { defineStore } from 'pinia';

export const useUserStore = defineStore('user', {
  state: () => ({
    userInfo: {
      firstName: '',
      lastName: '',
      businessName: '',
      businessType: '',
      identificationNumber: '',
      issueDate: ''
    }
  })
})
We can see this store on our browser with the Vue.js devtools chrome extension. This extension will be downloaded then opened via chrome’s inspection tool. The demo to get to this extension will be displayed with pictures:
-
Open the chrome’s
inspectiontool
-
Open the dropdown and select
vue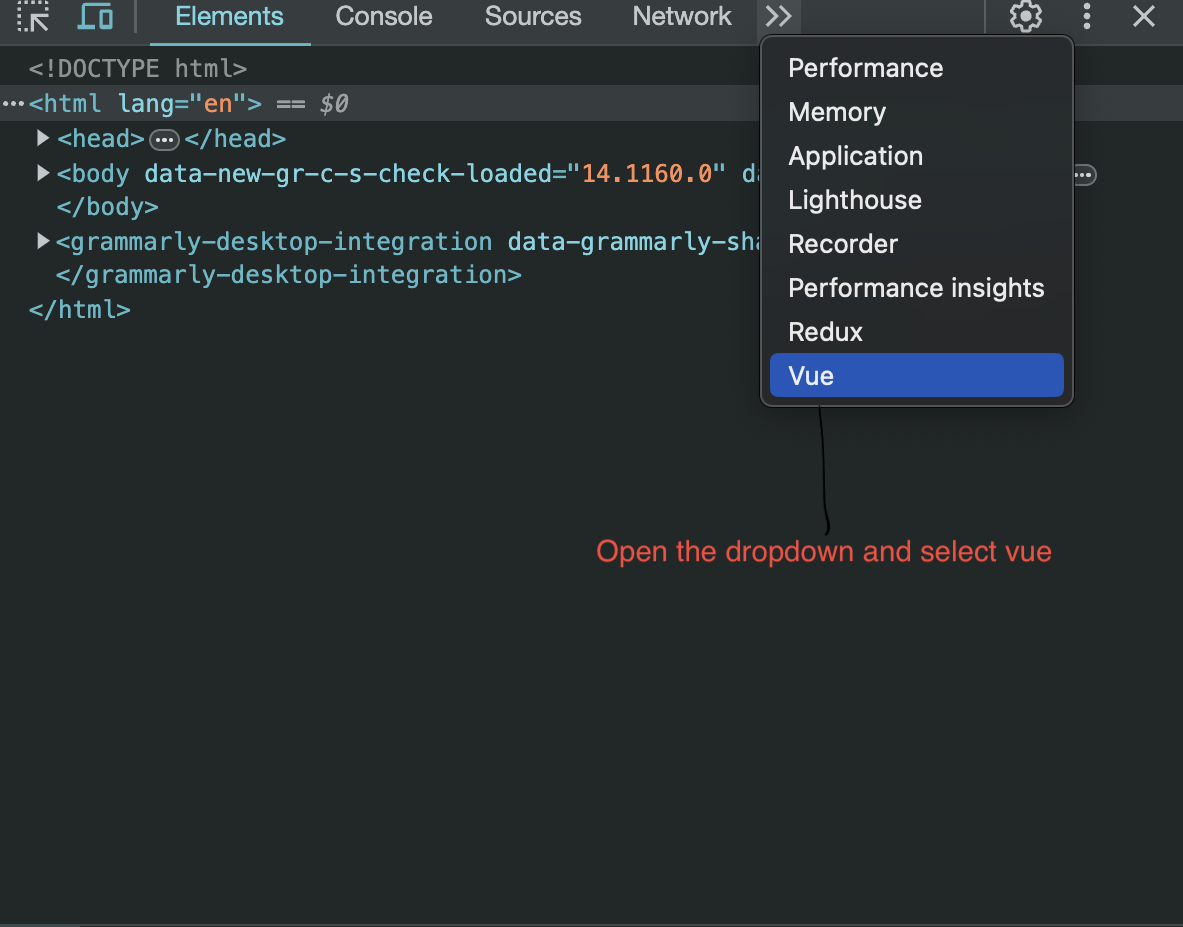
-
Select the “pineapple” symbol to open the
piniastore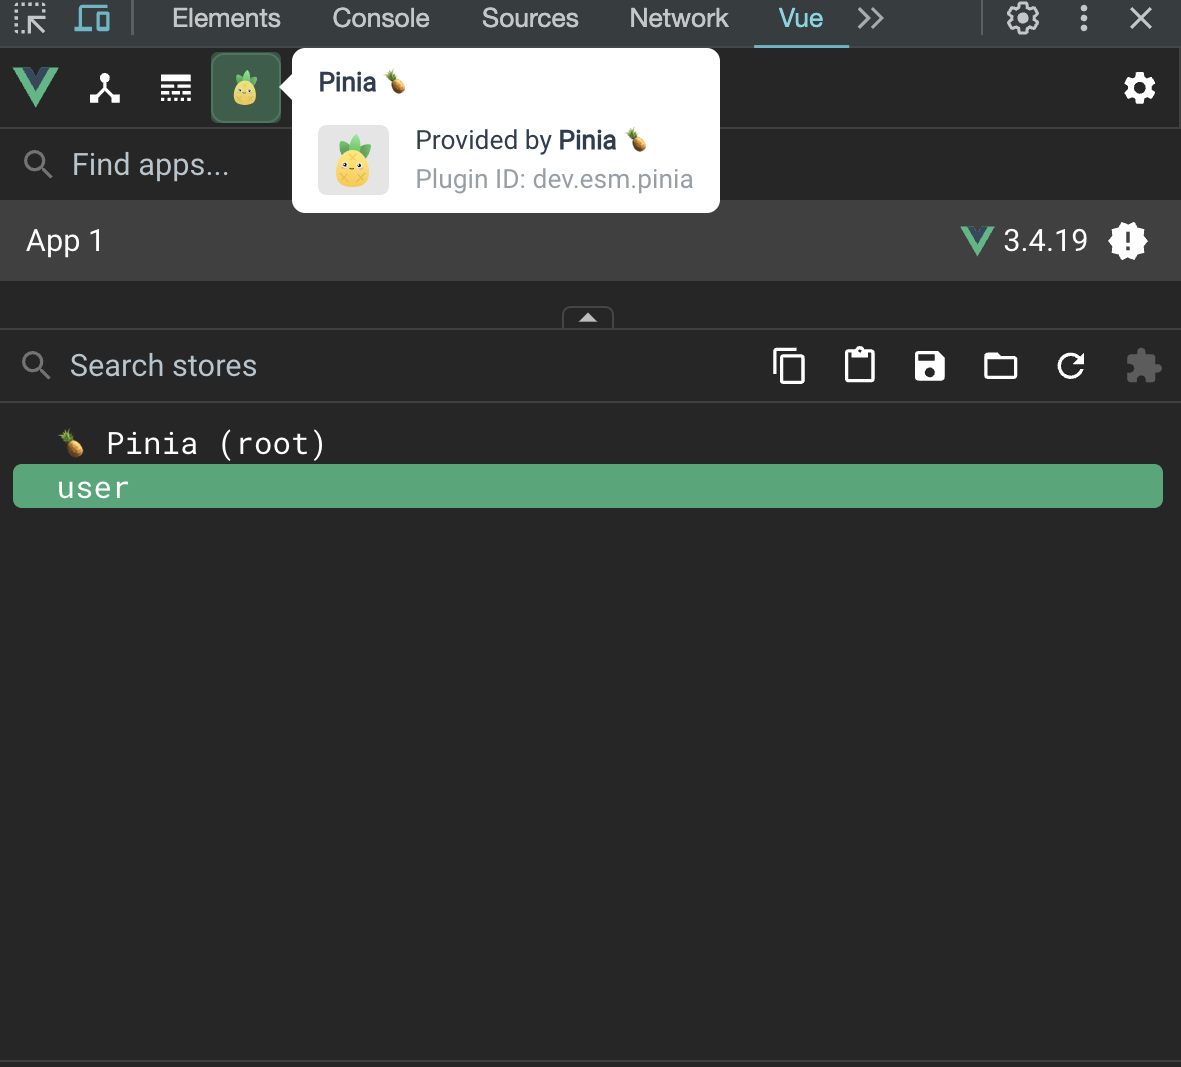
-
Once you open the
piniastore, you will see the store’s name, which isuser. Click onuser,and you will see thestate.
Then we will create an action called updateUserInfo, which will update the userInfo object with new data.
//FormDataStore.js
import { defineStore } from "pinia";

export const useUserStore = defineStore("user", {
  state: () => ({
    userInfo: {
      firstName: "",
      lastName: "",
      businessName: "",
      businessType: 0,
      identificationNumber: "",
      issueDate: "",
    },
  }),

  actions: {
    //update the user info with the updateUserInfo action
    updateUserInfo(newData) {
      this.userInfo = { ...this.userInfo, ...newData };
    },
  },
});
In the PersonalInfo.vue component, we will import the useUserStore. Inside the handleSubmit function, we will send the data entered by the business owner to the pinia store by dispatching an action updateUserInfo and adding the new data to be sent as an argument in the action.
// PersonalInfo.vue
<template>
<div>
<h2>Personal Information</h2>
<form @submit.prevent="handleSubmit">
<div>
<label for="firstName">First Name:</label>
<input type="text" id="firstName" v-model="firstName" />
</div>
<div>
<label for="lastName">Last Name:</label>
<input type="text" id="lastName" v-model="lastName" />
</div>
<button type="submit">Submit</button>
</form>
</div>
</template>
<script setup>
import { ref } from 'vue'
import { useUserStore } from '@/store/FormDataStore'
const userStore = useUserStore()
const emit = defineEmits(['update:currentForm'])
const firstName = ref('')
const lastName = ref('')
const handleSubmit = () => {
// dispatch the updateUserInfo action to update the userInfo object in the state
userStore.updateUserInfo({
firstName: firstName.value,
lastName: lastName.value
})
// Emit event to notify parent component to move to the next form section
emit('update:currentForm', 2)
}
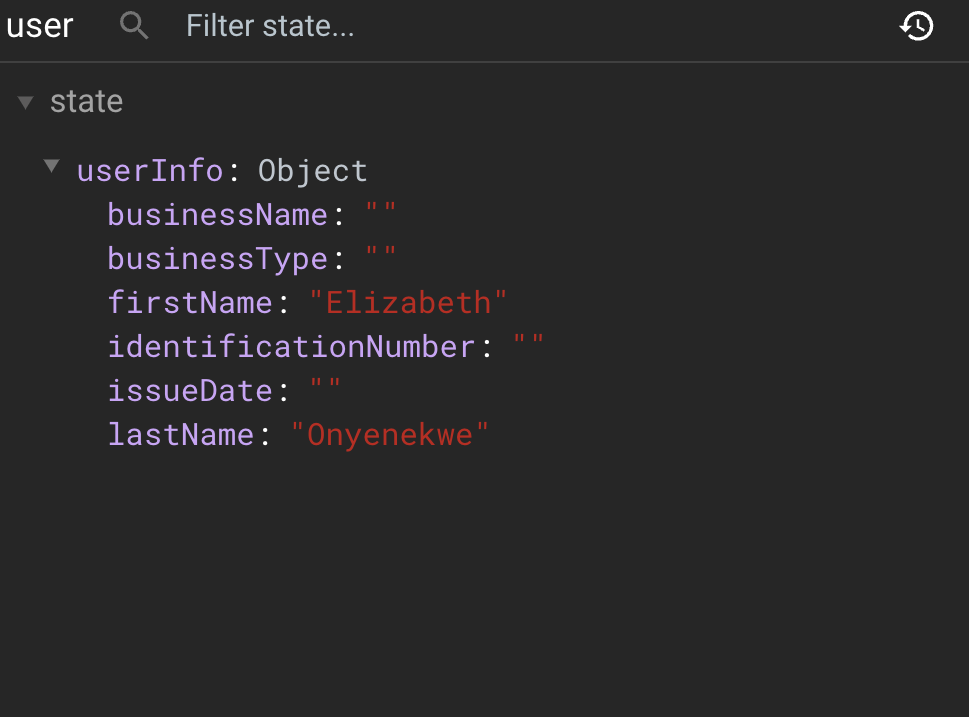
</script>Once the PersonalInfo.vue data has been sent to the store, a new form will be displayed, and the data will be stored in the pinia store. Your store should look like this:
In the BusinessInfo.vue component we will import the useUserStore. Inside the handleSubmit function, we will send the data entered by the business owner to the Pinia store by dispatching an action updateUserInfo and adding the new data to be sent as an argument in the action.
//BusinessInfo.vue
<template>
<div>
<h2>Business Information</h2>
<form @submit.prevent="handleSubmit">
<div>
<label for="businessName">Business Name:</label>
<input type="text" id="businessName" v-model="businessName" />
</div>
<div>
<label for="businessType">Business Type:</label>
<input type="text" id="businessType" v-model="businessType" />
</div>
<button type="submit">Submit</button>
<button class='previous' @click="goToPreviousForm" type="button">Previous</button>
</form>
</div>
</template>
<script setup>
import { ref } from 'vue'
import { useUserStore } from '@/store/FormDataStore'
const userStore = useUserStore()
const emit = defineEmits(['update:currentForm'])
const businessName = ref('')
const businessType = ref('')
const handleSubmit = () => {
// dispatch the updateUserInfo action to update the userInfo object in the state
userStore.updateUserInfo({
businessName: businessName.value,
businessType: businessType.value
})
// Emit event to notify parent component to move to the next form section
emit('update:currentForm', 3)
}
const goToPreviousForm = () => {
// Emit event to notify parent component to move to the previous form section
emit('update:currentForm', 1)
}
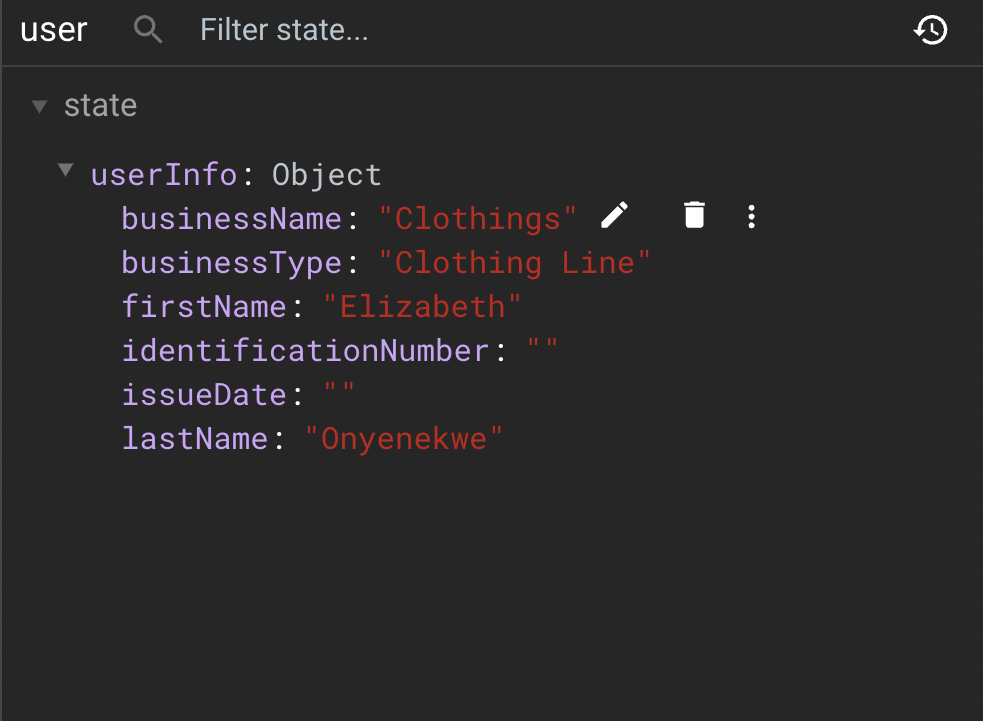
</script>Once the BusinessInfo.vue data has been sent to the store, a new form will be displayed and the data will be stored in the pinia store.
Your store should look like this:
In the KycDetails.vue component we will import the useUserStore. Inside the handleSubmit function, we will send the data entered by the business owner to the pinia store by dispatching an action updateUserInfo and adding the new data to be sent as an argument in the action.
//KycDetails.vue
<template>
<div>
<h2>KYC Details</h2>
<form @submit.prevent="handleSubmit">
<div>
<label for="identificationNumber">Identification Number:</label>
<input type="text" id="identificationNumber" v-model="identificationNumber" />
</div>
<div>
<label for="issueDate">Issue Date:</label>
<input type="date" id="issueDate" v-model="issueDate" />
</div>
<button type="submit">Submit</button>
<button class='previous' @click="goToPreviousForm" type="button">Previous</button>
</form>
</div>
</template>
<script setup>
import { ref } from 'vue'
import { useUserStore } from '@/store/FormDataStore'
const userStore = useUserStore()
const emit = defineEmits(['update:currentForm'])
const identificationNumber = ref('')
const issueDate = ref('')
const handleSubmit = () => {
// dispatch the updateUserInfo action to update the userInfo object in the state
userStore.updateUserInfo({
identificationNumber: identificationNumber.value,
issueDate: issueDate.value
})
alert('Your information has been saved')
}
const goToPreviousForm = () => {
// Emit event to notify parent component to move to the previous form section
emit('update:currentForm', 2)
}
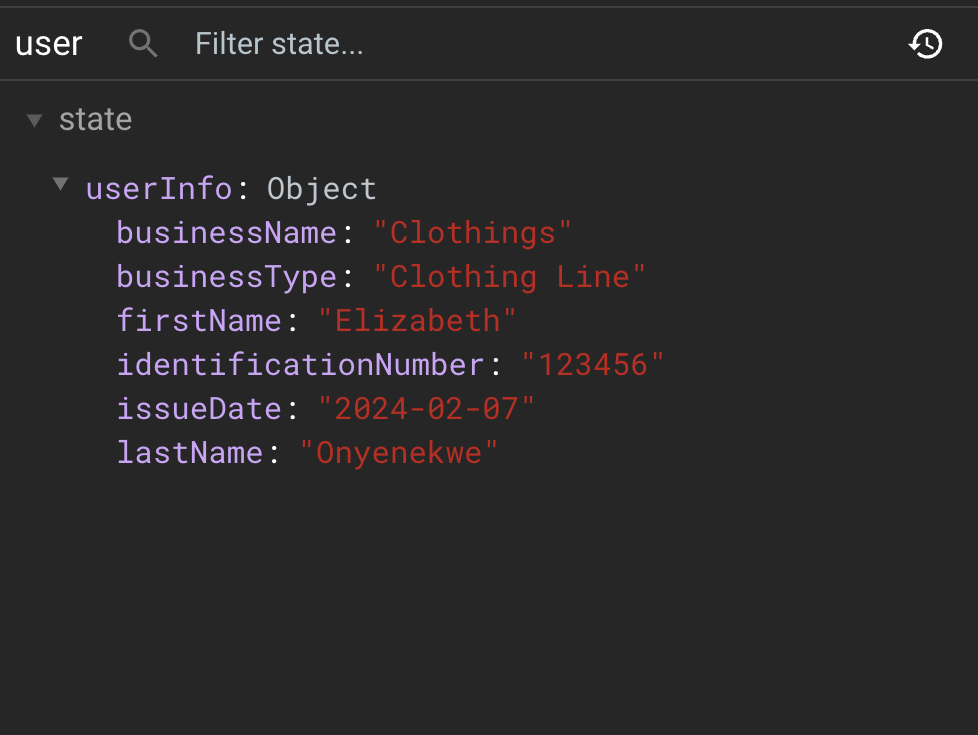
</script>Once the KycDetails.vue data has been sent to the store, a new form will be displayed and the data will be stored in the pinia store.
Your store should look like this:
After the KycDetails.vue has been filled, all the data from all the forms has been stored in the pinia store, and the developer can do what he wants with this data.
Validating the Form
Now that all the components have been built, we must ensure that the business owner fills all the required fields before submitting them to the store. This will be done in each component:
In the PersonalInfo.vue component, when the business owner clicks the submit button, a function handleSubmit is called to check if firstName and the lastName information exists. If it doesn’t, we will tell the business owner to fill in all the fields. If the information exists, we will dispatch the updateUserInfo action and save this information in the store.
//PersonalInfo.vue
<template>
  <div>
    <h2>Personal Information</h2>
    <form @submit.prevent="handleSubmit">
      <div>
        <label for="firstName">First Name:</label>
        <input type="text" id="firstName" v-model="firstName" />
      </div>
      <div>
        <label for="lastName">Last Name:</label>
        <input type="text" id="lastName" v-model="lastName" />
      </div>
      <button type="submit">Submit</button>
    </form>
  </div>
</template>

<script setup>
import { ref, defineEmits } from 'vue'
import { useUserStore } from '@/store/FormDataStore'

const userStore = useUserStore()
const emit = defineEmits(['update:currentForm'])
const firstName = ref('')
const lastName = ref('')

const handleSubmit = () => {
  // Basic validation: Check if first name and last name are not empty
  if (!firstName.value.trim() || !lastName.value.trim()) {
    alert('Please fill in all fields.')
    return
  }

  // If both fields are filled, update user info in the store and proceed
  userStore.updateUserInfo({
    firstName: firstName.value,
    lastName: lastName.value
  })

  // Emit event to notify parent component to move to the next form section
  emit('update:currentForm', 2)
}
</script>
In the BusinessInfo.vue component, when the business owner clicks the submit button, a function handleSubmit is called to check if businessName and the businessType information exists. If it doesn’t, we will tell the business owner to fill in all the fields. If the information exists, we will dispatch the updateUserInfo action and save this information in the store.
// BusinessInfo.vue
<template>
  <div>
    <h2>Business Information</h2>
    <form @submit.prevent="handleSubmit">
      <div>
        <label for="businessName">Business Name:</label>
        <input type="text" id="businessName" v-model="businessName" />
      </div>
      <div>
        <label for="businessType">Business Type:</label>
        <input type="text" id="businessType" v-model="businessType" />
      </div>
      <button type="submit">Submit</button>
      <button class='previous' @click="goToPreviousForm" type="button">Previous</button>
    </form>
  </div>
</template>

<script setup>
import { ref, defineEmits } from 'vue'
import { useUserStore } from '@/store/FormDataStore'

const userStore = useUserStore()
const emit = defineEmits(['update:currentForm'])
const businessName = ref('')
const businessType = ref('')

const handleSubmit = () => {
  // Basic validation: Check if business name and business type are not empty
  if (!businessName.value.trim() || !businessType.value.trim()) {
    alert('Please fill in all fields.')
    return
  }

  // If both fields are filled, update user info in the store and proceed
  userStore.updateUserInfo({
    businessName: businessName.value,
    businessType: businessType.value
  })

  // Emit event to notify parent component to move to the next form section
  emit('update:currentForm', 3)
}

const goToPreviousForm = () => {
  // Emit event to notify parent component to move to the previous form section
  emit('update:currentForm', 1)
}
</script>
In the KycDetails.vue component, when the business owner clicks the submit button, a function handleSubmit is called to check if identificationNumber and the issueDate information exists. If it doesn’t, we will tell the business owner to fill in all the fields. If the information exists, we will dispatch the updateUserInfo action and save this information in the store.
// KycDetails.vue
<template>
  <div>
    <h2>KYC Details</h2>
    <form @submit.prevent="handleSubmit">
      <div>
        <label for="identificationNumber">Identification Number:</label>
        <input type="text" id="identificationNumber" v-model="identificationNumber" />
      </div>
      <div>
        <label for="issueDate">Issue Date:</label>
        <input type="date" id="issueDate" v-model="issueDate" />
      </div>
      <button type="submit">Submit</button>
      <button class='previous' @click="goToPreviousForm" type="button">Previous</button>
    </form>
  </div>
</template>

<script setup>
import { ref, defineEmits } from 'vue'
import { useUserStore } from '@/store/FormDataStore'

const userStore = useUserStore()
const emit = defineEmits(['update:currentForm'])
const identificationNumber = ref('')
const issueDate = ref('')

const handleSubmit = () => {
  // Basic validation: Check if identification number and issue date are not empty
  if (!identificationNumber.value.trim() || !issueDate.value.trim()) {
    alert('Please fill in all fields.')
    return
  }

  // If both fields are filled, update user info in the store and proceed
  userStore.updateUserInfo({
    identificationNumber: identificationNumber.value,
    issueDate: issueDate.value
  })
  alert('Your information has been saved')
}

const goToPreviousForm = () => {
  // Emit event to notify parent component to move to the previous form section
  emit('update:currentForm', 2)
}
</script>
Result
In this section, we are going to see our code on the browser and how each data is stored in the pina store using the Vue devtools chrome extension. You can watch how the data is stored in a multipart form in this youtube video.
Conclusion
Creating multipart forms with vue and pinia makes online interactions smoother and more user-friendly. This guide show how these tools can build forms that collect various kinds of information, from basic details to uploads like photos or documents.
Gain Debugging Superpowers
Unleash the power of session replay to reproduce bugs, track slowdowns and uncover frustrations in your app. Get complete visibility into your frontend with OpenReplay — the most advanced open-source session replay tool for developers. Check our GitHub repo and join the thousands of developers in our community.