Building an URL Shortener with Bun

Long URLs pose several drawbacks, including inconvenience in sharing due to their cumbersome nature, difficulty in readability, unattractive aesthetics, and potential negative impacts on SEO. To enhance user experience and mitigate these challenges, you need a URL-shortening service like bit.ly. In this article, you will learn how to build a URL shortener of your own using Bun, Elysia, and MySQL.

Discover how at OpenReplay.com.
A URL shortener is a service that converts a long URL into a shorter URL. The conversion process typically combines URL redirection with a unique identifier system.
When a user submits a long URL to your URL shortener, the service generates a unique identifier representing the original URL. This identifier is appended to your shortener’s domain name, forming a new, shortened URL.
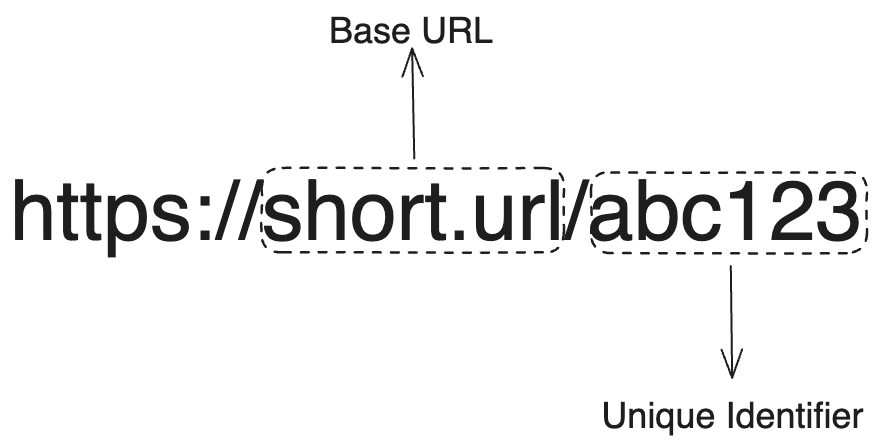
For example, a long URL like https://www.example.com/article/how-url-shorteners-work might be shortened to https://short.url/abc123.
When a user clicks on the shortened link, their browser sends a request to your shortener. When your shortener receives the request, it extracts the unique identifier and then looks up the corresponding long URL associated with that identifier in its database.
Once the long URL is retrieved, your server will issue a redirection response to the user’s browser, instructing it to navigate to the original URL.
Additionally, URL shorteners often offer additional features such as analytics, allowing users to track the number of clicks on their shortened links and other relevant metrics.
Setting Up Your Development Environment
As mentioned earlier, you will build a URL shortener using Bun, Elysia, and MySQL in this tutorial. In this section, you will create and initialize a new project, connect to your database, and create the data models for your URL shortener.
First, create your project directory by running the command below:
mkdir url-shortener && cd url-shortenerNext, initialize Bun in your application by running the command below:
bun initNext, run the command below to install the dependencies required by your project:
bun add elysia prisma mysql2 nanoid @prisma/client dotenvThe packages you installed above include the following:
- Elysia: Elysia is a performance-focused HTTP framework for Bun, similar to Express but 21x faster.
- Prisma: Prisma is an object-relational mapper (ORM) for JavaScript and TypeScript.
- MySQL2: MySQL2 is a MySQL client for Node.js applications.
- Nanoid: Nanoid is a compact and secure unique string generator. You will need this package to identify each URL uniquely.
- Dotenv: Dotenv is an NPM package that loads environmental variables from a
.envfile intoprocess.env.
Finally, create a src folder in your project’s root directory. This is where you will store all your application’s source files. Create your service and controller files in your src folder, shortener.service.ts and shortener.controller.ts, respectively.
Connecting to Your Database
After installing the required packages, run the command below to initialize Prisma in your project.
npx prisma initRunning the above command initializes Prisma in your application and creates a prisma folder, a .env file, and a .gitignore in your root directory. Inside the prisma folder, you will find a schema.prisma file.
The schema.prisma file contains information on how your application interacts with Prisma, including a data source and a generator.
The data source specifies how Prisma should connect to your database.
By default, the data source provider is set to postgresql. Change it to mysql, as shown in the code block below:
datasource db {
  provider = "mysql"
  url      = env("DATABASE_URL")
}
Next, open your .env file and replace the dummy DATABASE_URL with your actual MySQL database connection string.
Creating Your Data Models
Next, add the code block below to your schema.prisma file to create your Url data model:
model Url {
   id        Int      @id @default(autoincrement())
   longUrl   String
   shortUrl  String
   uniqueId  String
   createdAt DateTime @default(now())
}
The code block above represents your Url model. It contains information you need to make your shortening service work, including the longUrl, which is the long URL provided by the user, shortUrl, which is the shortened form of the longUrl (a combination of your base URL and a unique identifier for the long URL), the uniqueId, and the createdAt date.
Next, run your migration to sync your database by running the command below:
npx prisma migrate dev --name initRunning the command above will sync your database with the models in your prisma.schema file.
Note: You can replace init with any name of your choice.
Now that you have set up your development environment, created your data model, and synced the model to your database, you will implement your URL-shortening login.
Implementing Your URL-Shortening Logic
In this section, you will implement the logic required to shorten a URL.
To shorten a URL, first, you must validate if the data you received from the user is valid to ensure that you only shorten valid URLs.
There are various ways to validate if a given string is a valid URL, including using Regex or third-party packages like class-validator. In this tutorial, you will validate the URL using Regex.
To validate the URL using Regex, create a utils.ts file and add the code block below to it:
//utils.ts
export function isURLValid(url: string): boolean {
  const urlPattern: RegExp = /^(http|https):\/\/[^ "]+$/;

  return urlPattern.test(url);
}
The function isURLValid in the code block above validates a given string against the provided urlPattern. urlPattern is a regex expression that matches strings that start with either “http” or “https”, followed by a colon and two forward slashes, and then followed by one or more characters that are not spaces or double quotes (in other words, a URL pattern).
Next, add the following imports to your shortener.service.ts.
import { PrismaClient } from "@prisma/client";
import { nanoid } from "nanoid";
import { isURLValid } from "./utils";
The imports above include PrismaClient for creating a connection between your application and Prisma, nanoid for generating a unique ID, and isURLValid for checking if a given string is valid.
After validating the given string, you need to check if your application has already shortened the URL to avoid duplicate short URLs. You can do this by querying your database for a record with the matching URL in the request payload.
Like so:
const urlExists = await prisma.url.findFirst({
  where: {
    longUrl,
  },
});

if (urlExists) {
  return urlExists.shortUrl;
}
If your application has shortened the URL, return the short URL to the user; otherwise, you must create a short URL for the long URL.
A short URL is made up of two parts: your application’s base URL and a unique identifier.
Your application’s base URL is the domain or subdomain on which your shortener is hosted, along with any additional path components if necessary. During development, your base URL is “localhost:<PORT>”. You can store your base URL in your .env file for more flexibility, especially when deploying the application to different environments (e.g., development, staging, production).
Like so:
BASE_URL = "http://localhost:3000"The unique identifier for the short url should be random and predictable. It also needs to be as short as possible while maintaining uniqueness; ideally, it should be around 7-10 characters.
You can generate a unique ID by calling the nanoid function. By default, calling nanoid will generate a unique ID with 21 characters. However, you can shorten it by passing your preferred length as an argument.
For example:
nanoid(10)After generating the unique ID, concatenate it with your application’s base URL.
Like so:
const shortUrl = `${baseURL}/${uniqueId}`;Next, create an instance of your Url model and save it to your database.
Like so:
const url = await prisma.url.create({
  data: {
    longUrl,
    shortUrl,
    uniqueId,
  },
});
Finally, return the short URL to the user.
You can implement the logic above by adding the code block below to your shortener.service.ts file:
//shortener.service.ts
export async function shortenUrl(longUrl: string) {
  try {
    //Is the Url valid?
    const isUrlValid = isURLValid(longUrl);

    if (!isUrlValid) {
      throw new Error("Invalid URL. Please enter a valid URL and try again");
    }

    //Has url already been shortened
    const urlExists = await prisma.url.findFirst({
      where: {
        longUrl,
      },
    });

    //Return already shortened URL
    if (urlExists) {
      return urlExists.shortUrl;
    }

    //Your base URL
    const baseURL = process.env.BASE_URL;

    //Unique identifier for the short URL
    const uniqueId = nanoid(10);

    //short url
    const shortUrl = `${baseURL}/${uniqueId}`;

    //Save to your database
    const url = await prisma.url.create({
      data: {
        longUrl,
        shortUrl,
        uniqueId,
      },
    });

    //Return the short url
    return {
      message: "URL shortened successfully",
      shortUrl: url.shortUrl,
    };
  } catch (error) {
    throw error;
  }
}
The function above takes in a string as an argument, validates it as a URL, shortens it, and returns it to the user.
Now you are done implementing the service layer of your URL shortening logic; you will implement your controller layer.
Implementing Controller Logic
Your controller for shortening URLs should handle POST requests to ‘/shorten’. When the controller receives the request, it should extract the long URL from the request body (or context object) and pass it as an argument to the shortenUrl function you implemented earlier.
To implement your controller logic, add the code below to your shortener.controller.ts file:
//shortener.controller.ts
import { Elysia } from "elysia";
import { shortenUrl } from "./shortener.service";

export const urlController = (app: Elysia) => {
  app.post("/shorten", async (context: any) => {
    const { longUrl } = context.body;

    const shortUrl = await shortenUrl(longUrl);

    return shortUrl;
  });
};
Now that you are done with fully implementing your shortening logic, you will implement your redirection logic.
Implementing Redirection Logic
In this section you will implement the logic required to redirect a user to their original URL using the shortened URL.
To redirect a user to the long URL using the shortened URL, you have to extract the unique ID from the short URL, fetch the long URL from your database, and redirect the user with a status code of 301 (Permanent Redirect). Redirecting the user with a 301 status code helps maintain SEO integrity.
Implementing Service Layer
For the redirection logic, your service layer should handle fetching the long URL that matches the unique ID provided by the client when they use the short URL.
To implement the logic above, add the code block below to your shortener.service.ts file:
//shortener.service.ts
export async function fetchUrl(urlUniqueId: string) {
  try {
    const url = await prisma.url.findFirst({
      where: {
        uniqueId: urlUniqueId,
      },
    });

    return url;
  } catch (error) {
    throw error;
  }
}
The code block above searches your database for a URL with a matching unique ID and return it.
Next, you will implement your controller layer logic for redirection.
Implementing Controller Layer
Your controller for redirection will handle GET requests made to your base URL with the /:uniqueId as a path parameter. When your controller receives the request, it should extract the unique ID from the params object on the context object and pass it as an argument to the fetchUrl function you created earlier.
To implement this functionality, first, update the imports from your service file to include fetchUrl in your controller file like so:
//shortener.controller.ts
import { shortenUrl, fetchUrl } from "./shortener.service";
Then, add the code block below to your urlController function directly under the route handler for /shorten.
//shortener.controller.ts
...

app.get("/:uniqueId", async (context) => {
  const uniqueId = context.params.uniqueId;

  const url = await fetchUrl(uniqueId);

  if (url) {
    context.set.status = 301;
    context.set.redirect = url.longUrl;
  } else {
    context.set.status = 404;
    return {
      message: "Page not found",
    };
  }
});

...
The code block above extracts a shortened URL’s unique ID from the request params and passes it as an argument to the fetchUrl function. If the fetchUrl function returns a URL, it sets the status code to 301 using Elysia’s set function and redirects the user to the long URL using the same set function. If no record of the url is found in your database, it returns a 404 status code (Not Found) and a message to the user.
Now that you’re done with your URL shortening and redirection logic, you need to create a server that will listen to the requests made to your application.
Creating Your Bun-Elysia Server
In this section, you will create a web server to listen for incoming requests made to your application.
To create a Bun-Elysia Server, first, add the following imports to your index.ts file:
import * as dotenv from "dotenv";
dotenv.config();
import Elysia from "elysia";
import { urlController } from "./src/shortener.controller";
The imports above include dotenv, which you imported and configured. It also includes Elysia and your urlController.
Next, add the code block below to your index.ts file to create a new Elysia app instance, mount your controller, and listen for traffic on port 3000.
//index.ts
const app = new Elysia();

app.use(urlController as any);

app.listen(3000, () => {
  console.log("Server is running on port 3000");
});
Now, your URL shortener is complete. Next, you will deploy it to the cloud using Render’s free hosting service and Docker to make it accessible to your users.
Deploying your URL Shortener
In this section you will deploy your URL shortener on Render using Docker.
Before deploying your application on Render using a docker container, you need a Dockerfile.
Run the command below to create a Dockerfile:
touch DockerfileThen, add the code block below to your Dockerfile:
FROM oven/bun

WORKDIR /app

COPY ./prisma prisma
COPY package.json .
COPY bun.lockb .

RUN bun install

COPY . .

EXPOSE 3000

CMD ["bun", "index.ts"]
The Dockerfile above sets up a Docker image for a Bun application, installs dependencies, and sets up the container to run the application with the bun command and index.ts file as an argument.
Next, create and push your code to a remote repository for your code on GitHub or GitLab.
Deploying on Render
To deploy your application on Render, you need an active account; you can sign up for free if you do not have one.
Note: To follow along with this deployment guide, your URL shortener must be available on GitHub/GitLab.
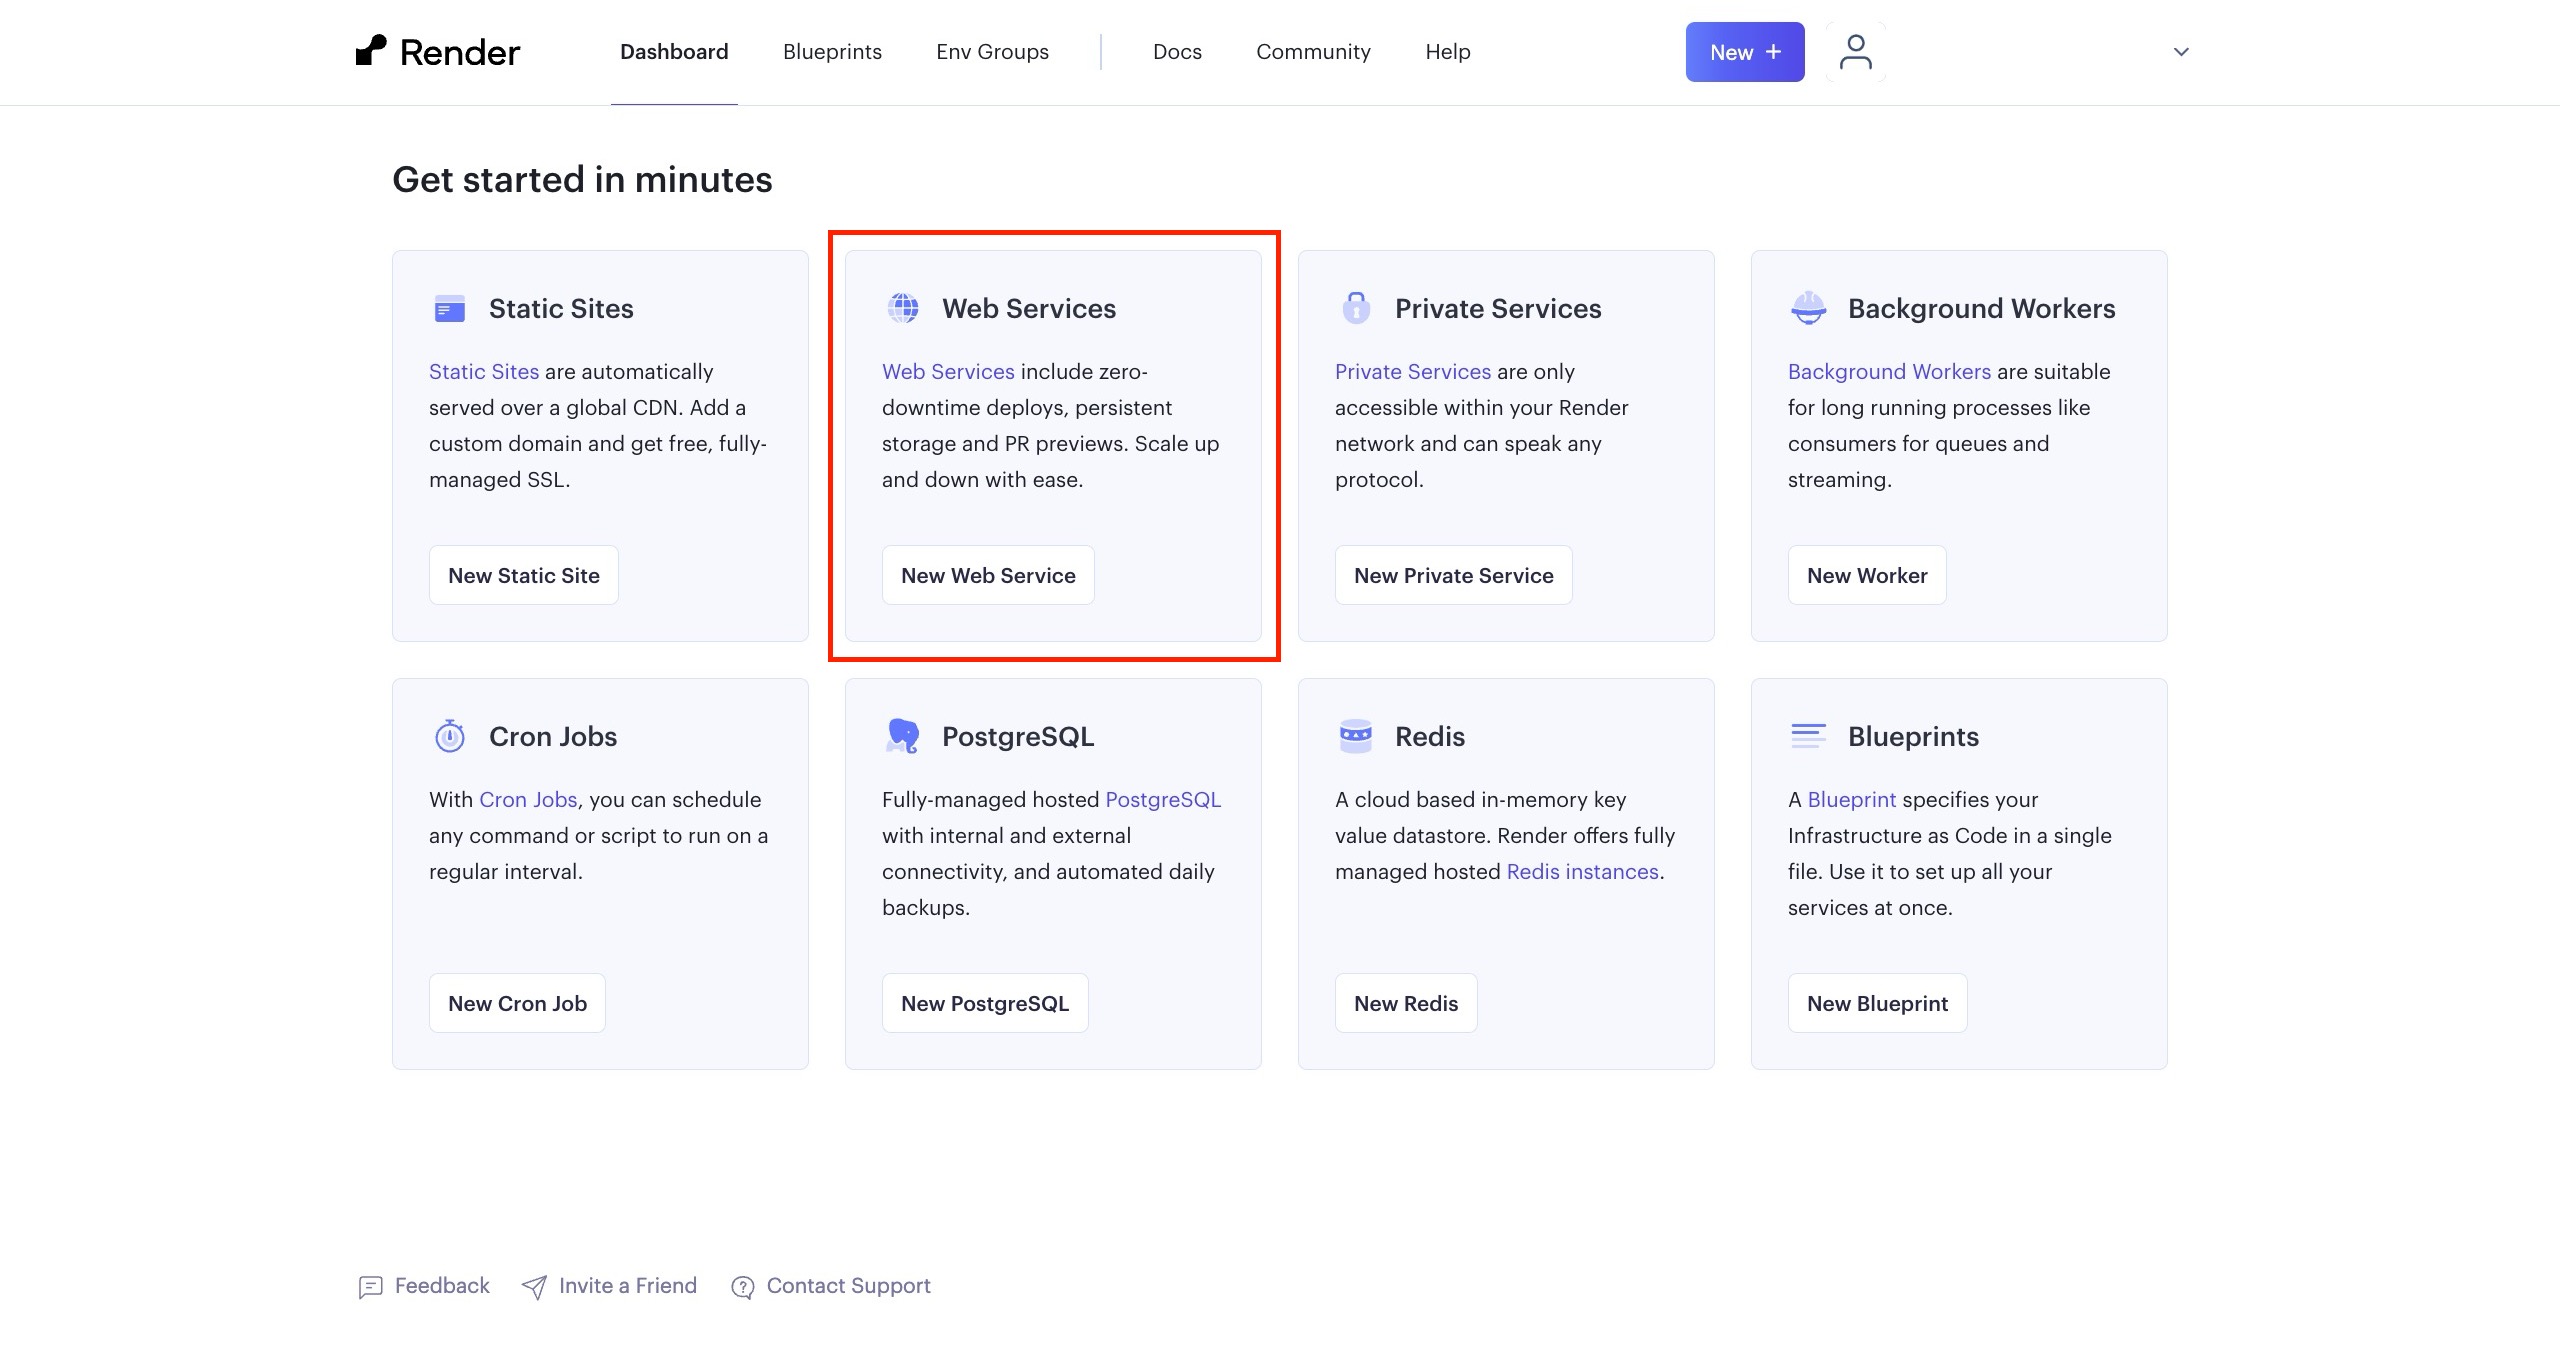
Next, log in to your account and navigate to your dashboard. On your dashboard, click “Web Services”.
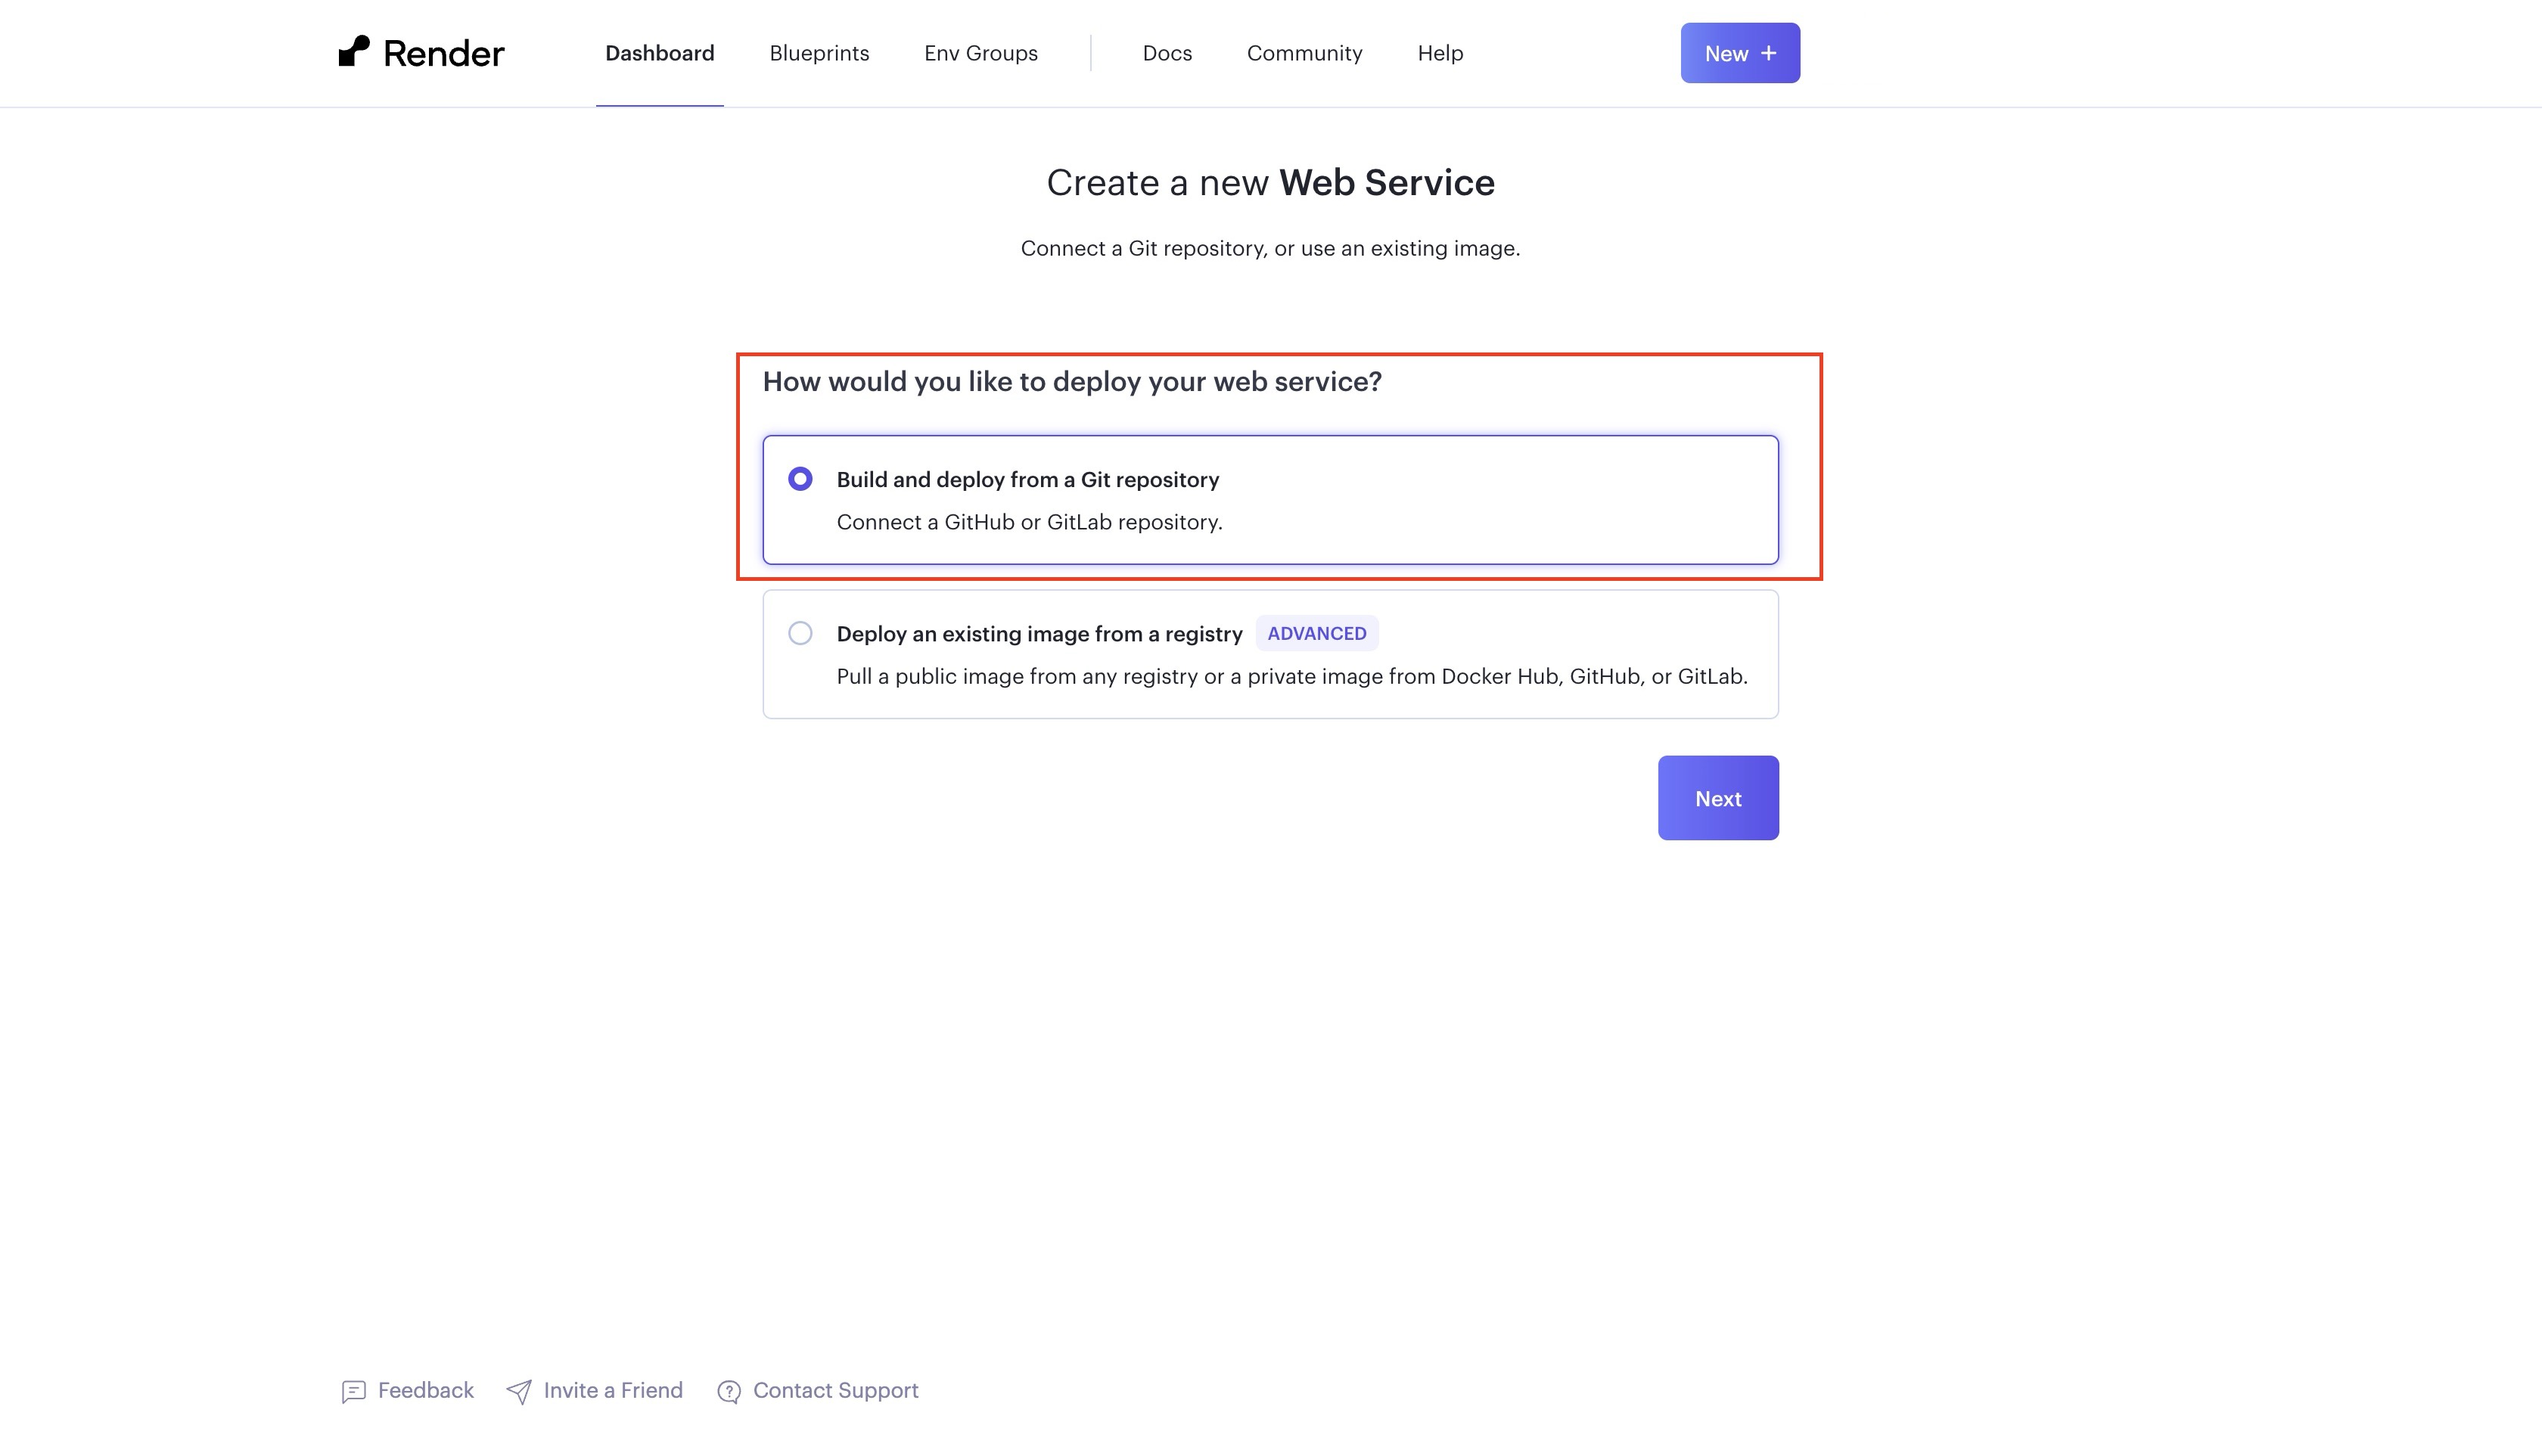
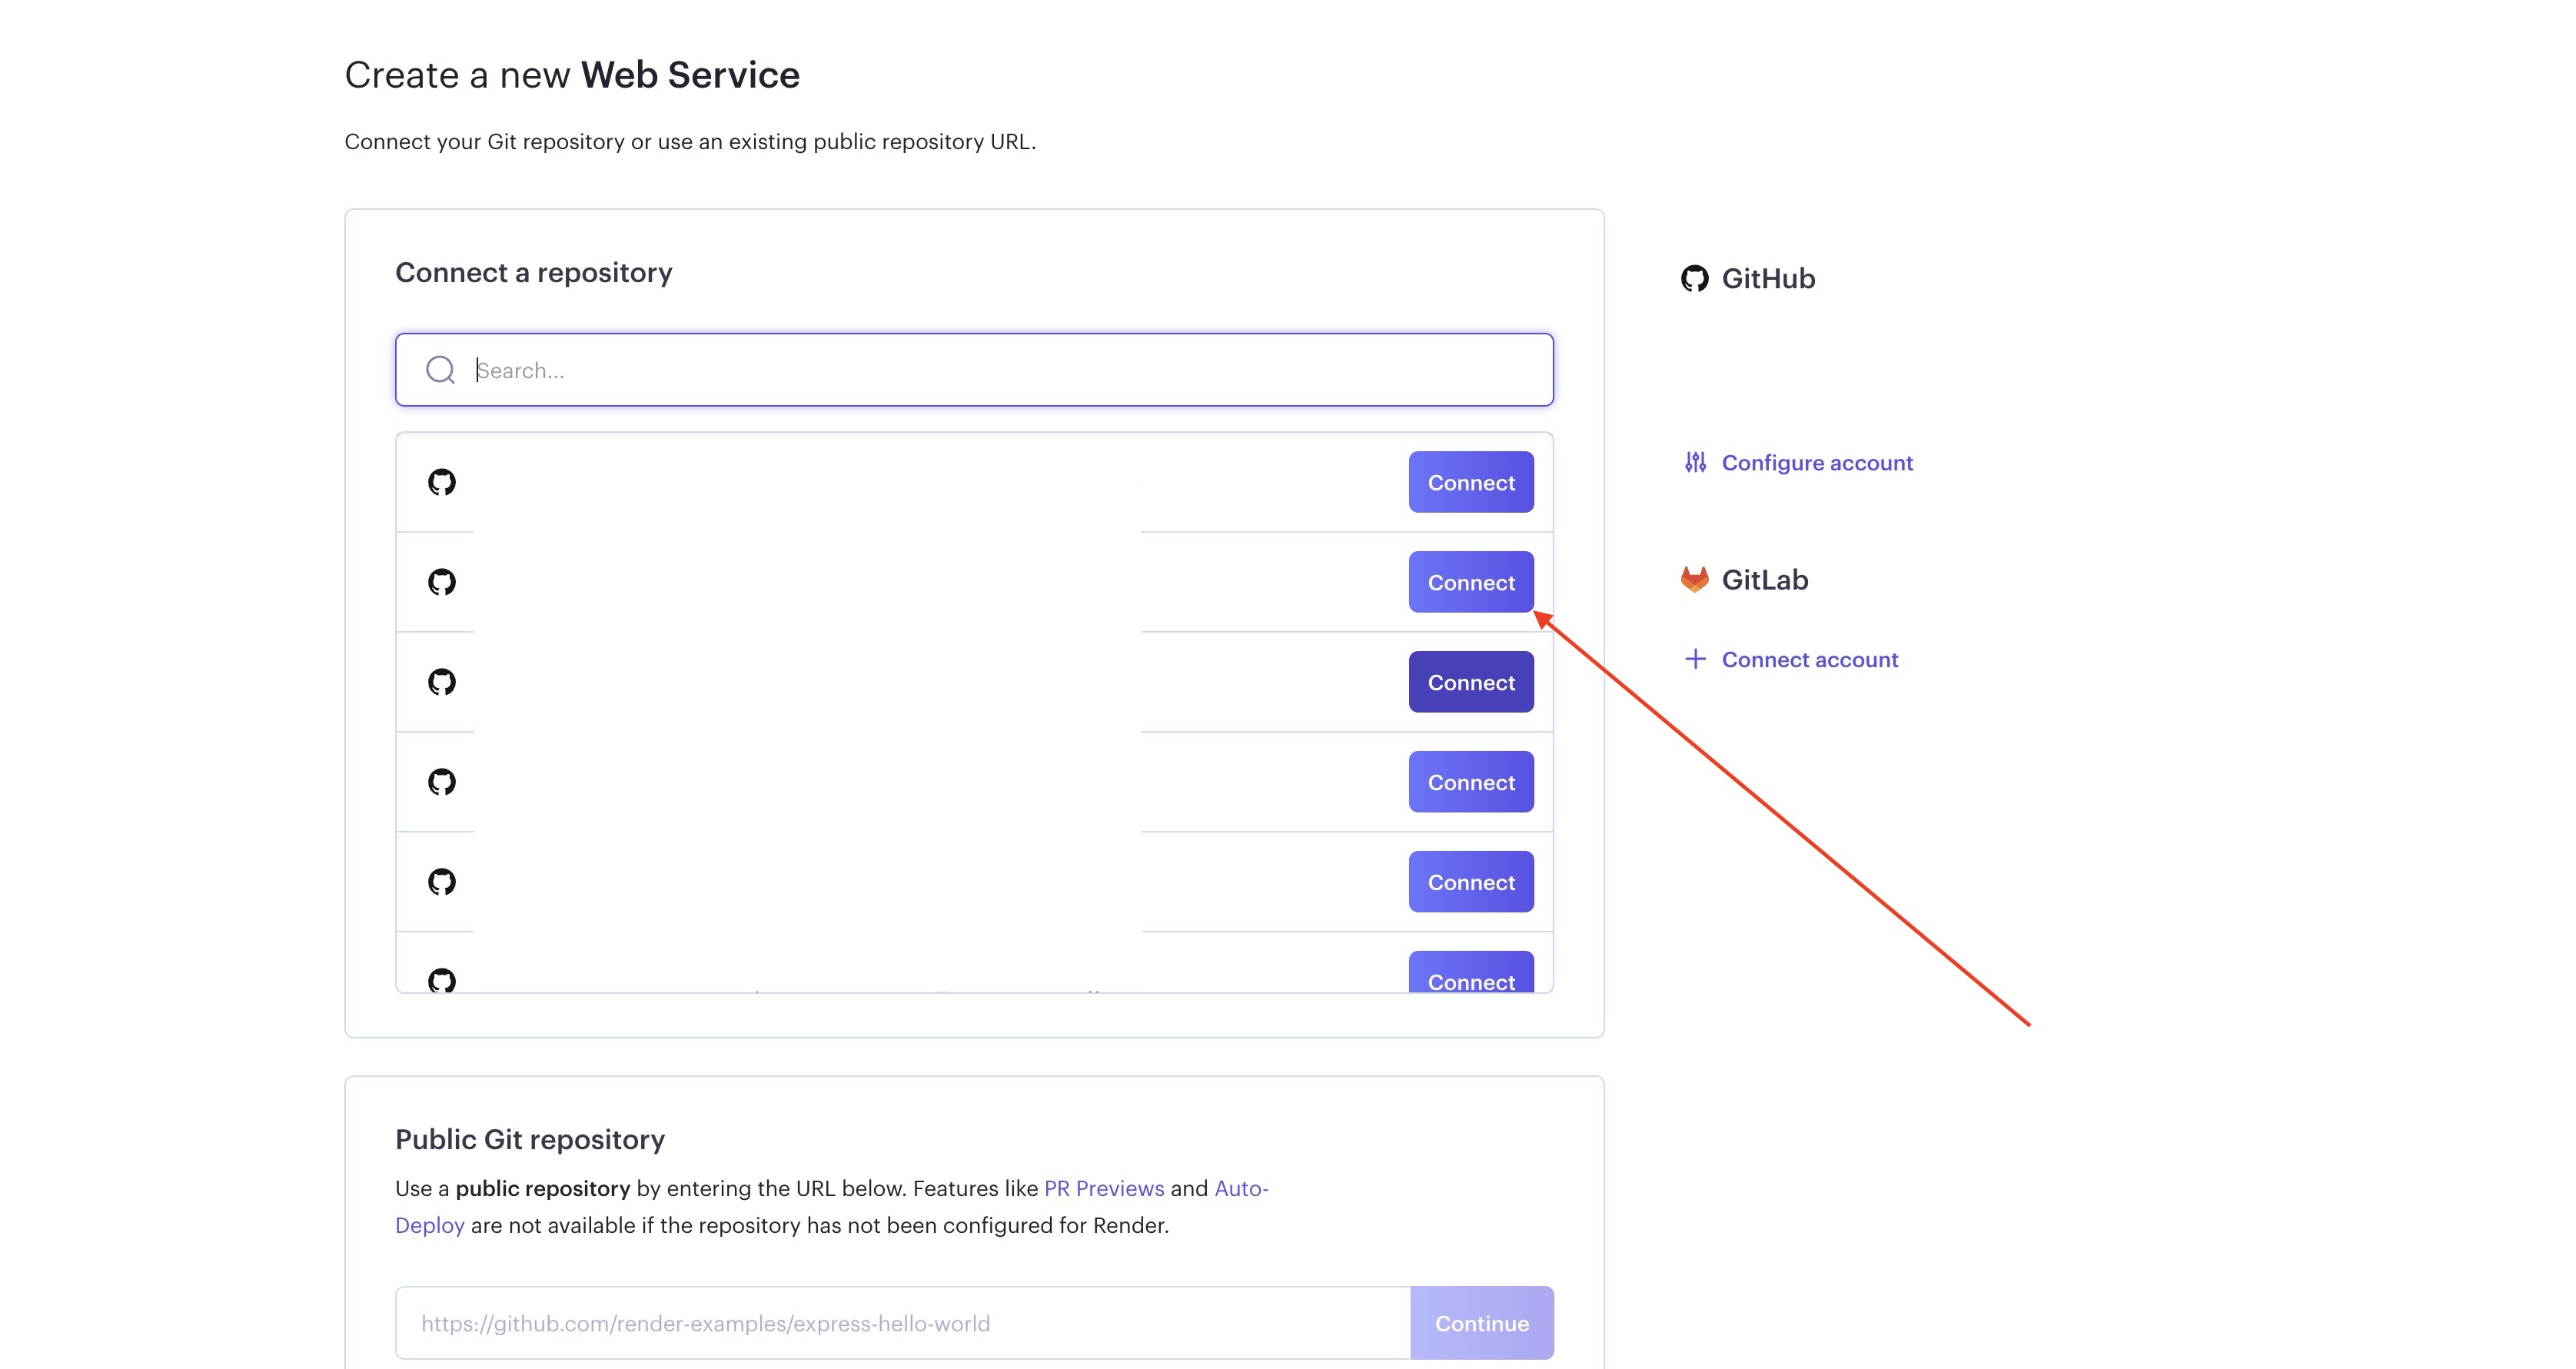
Next, select the option to “Build and deploy from a Git repository”, as shown in the image below, then press the next button.
Next, connect your GitHub/GitLab, select the URL shortener repository you want to deploy, and press connect.
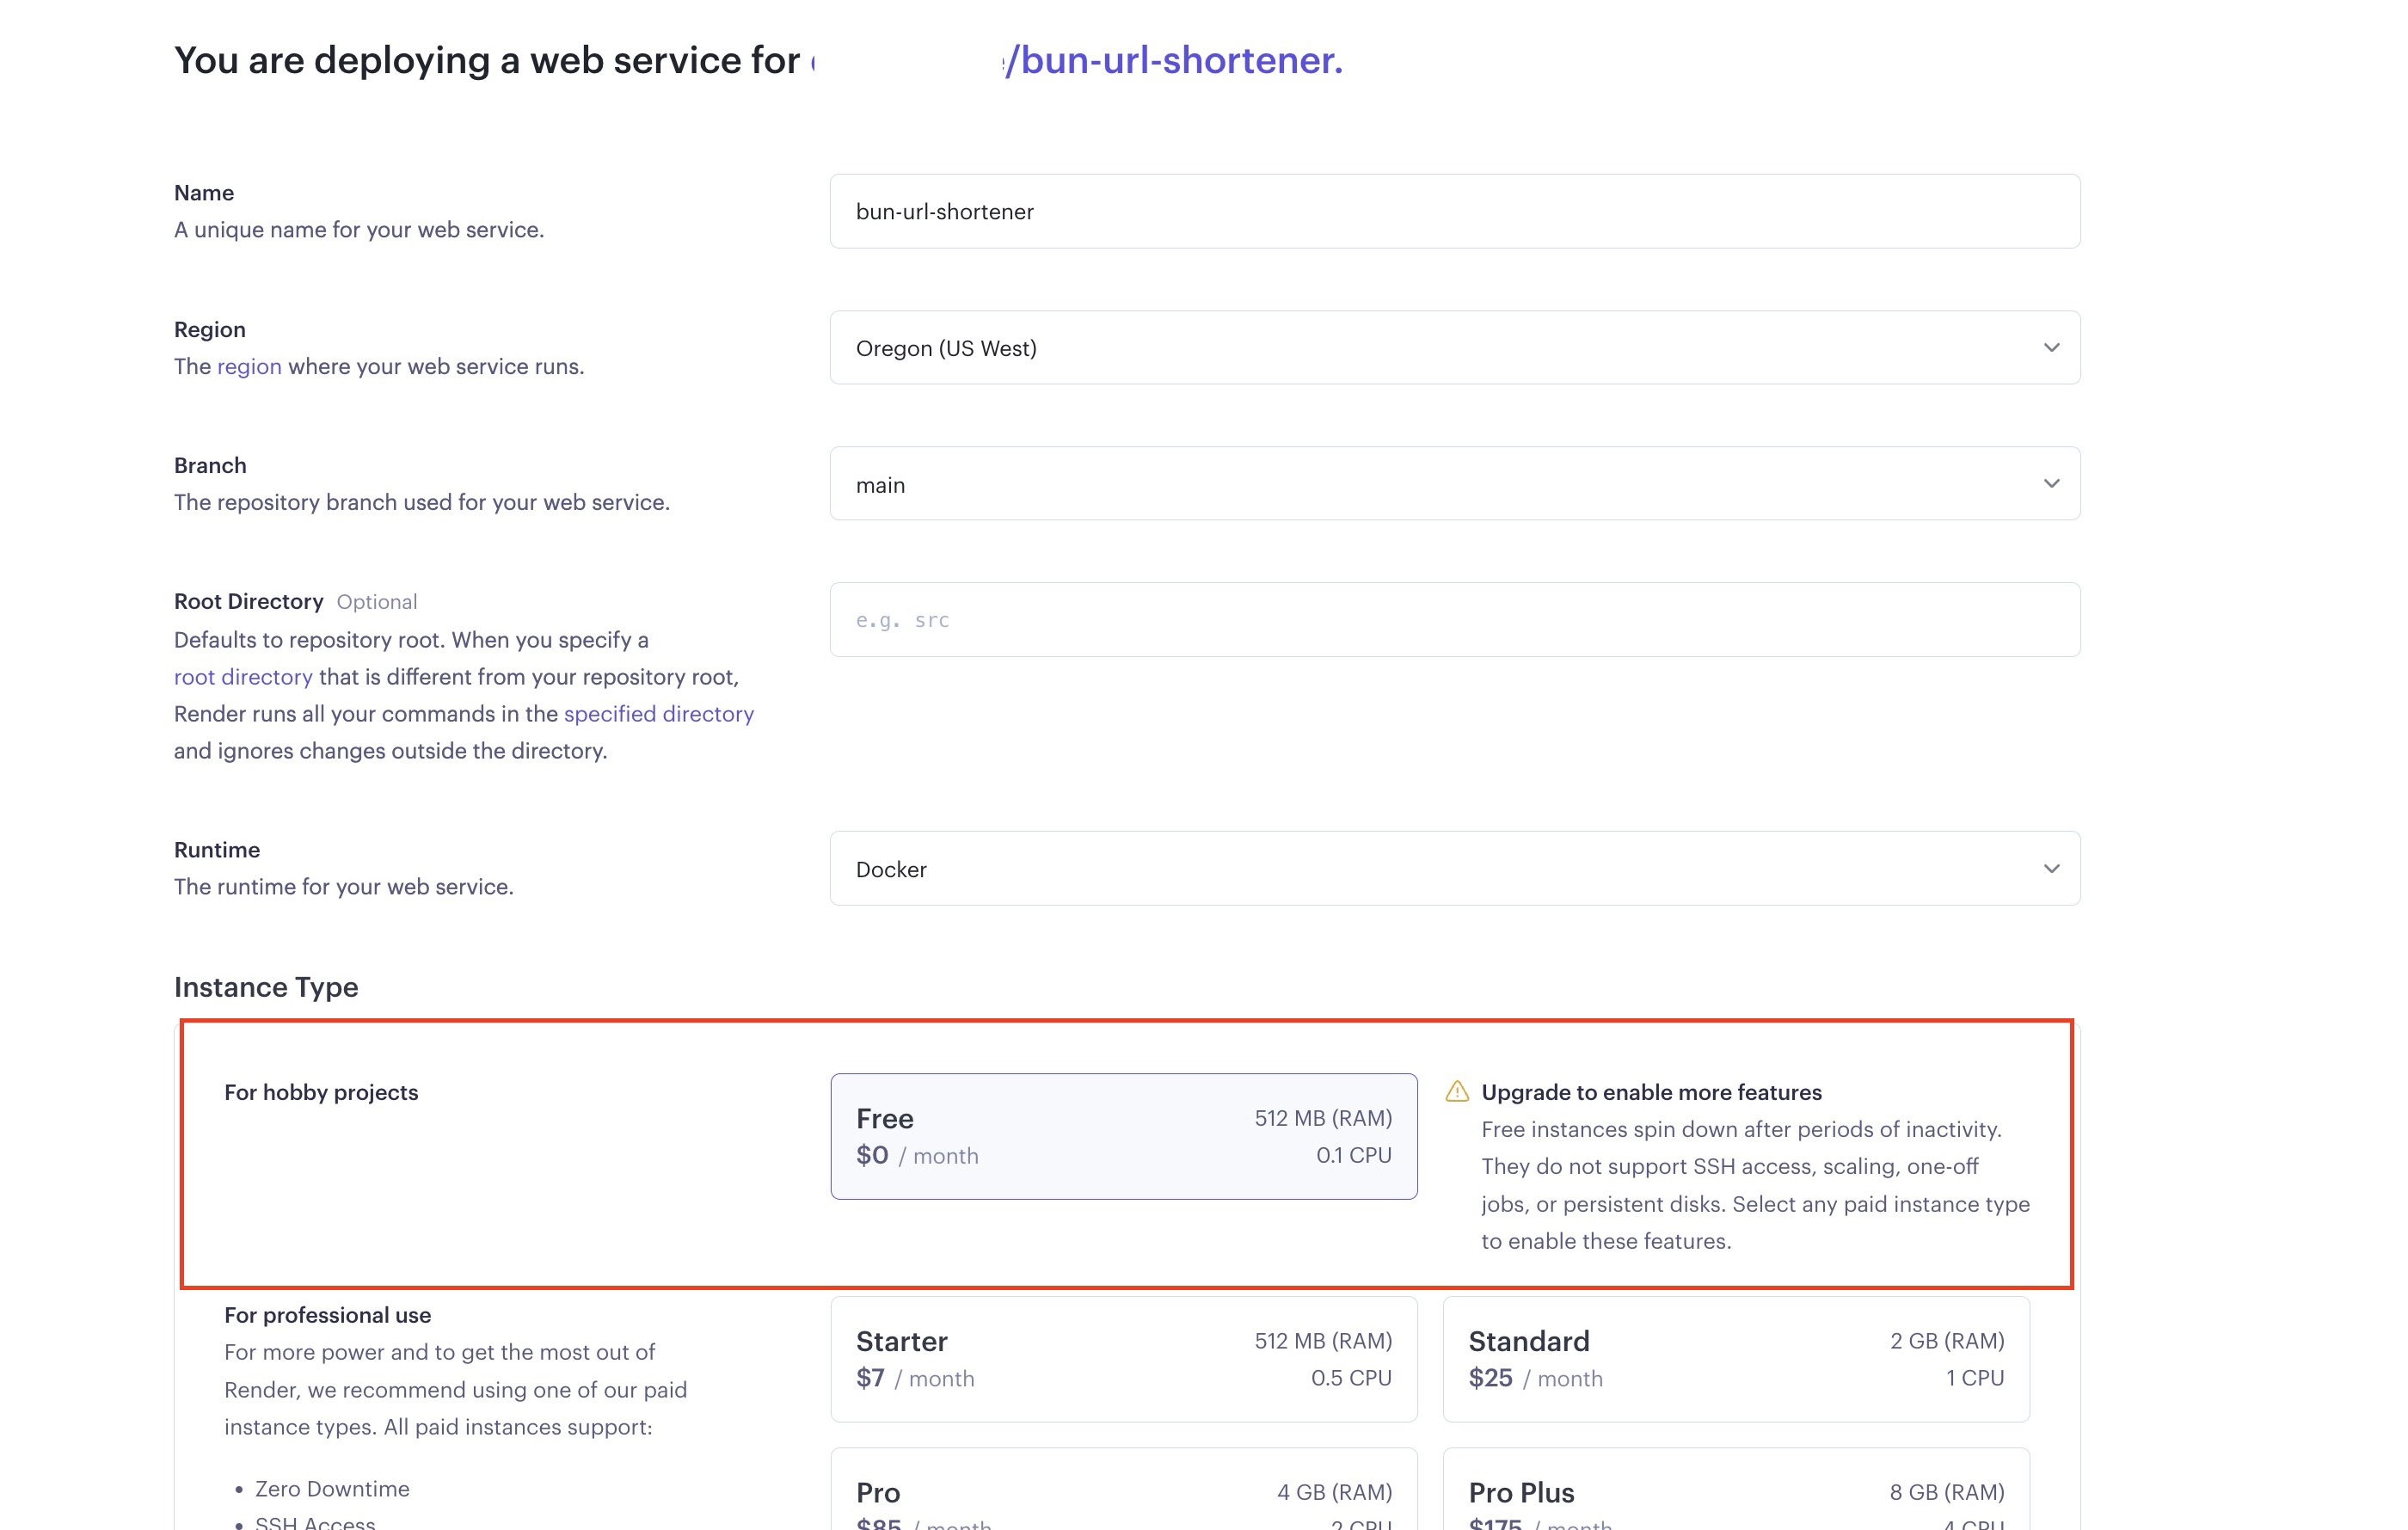
Next, fill out the required details in the configuration and select “Free” as your instance type.
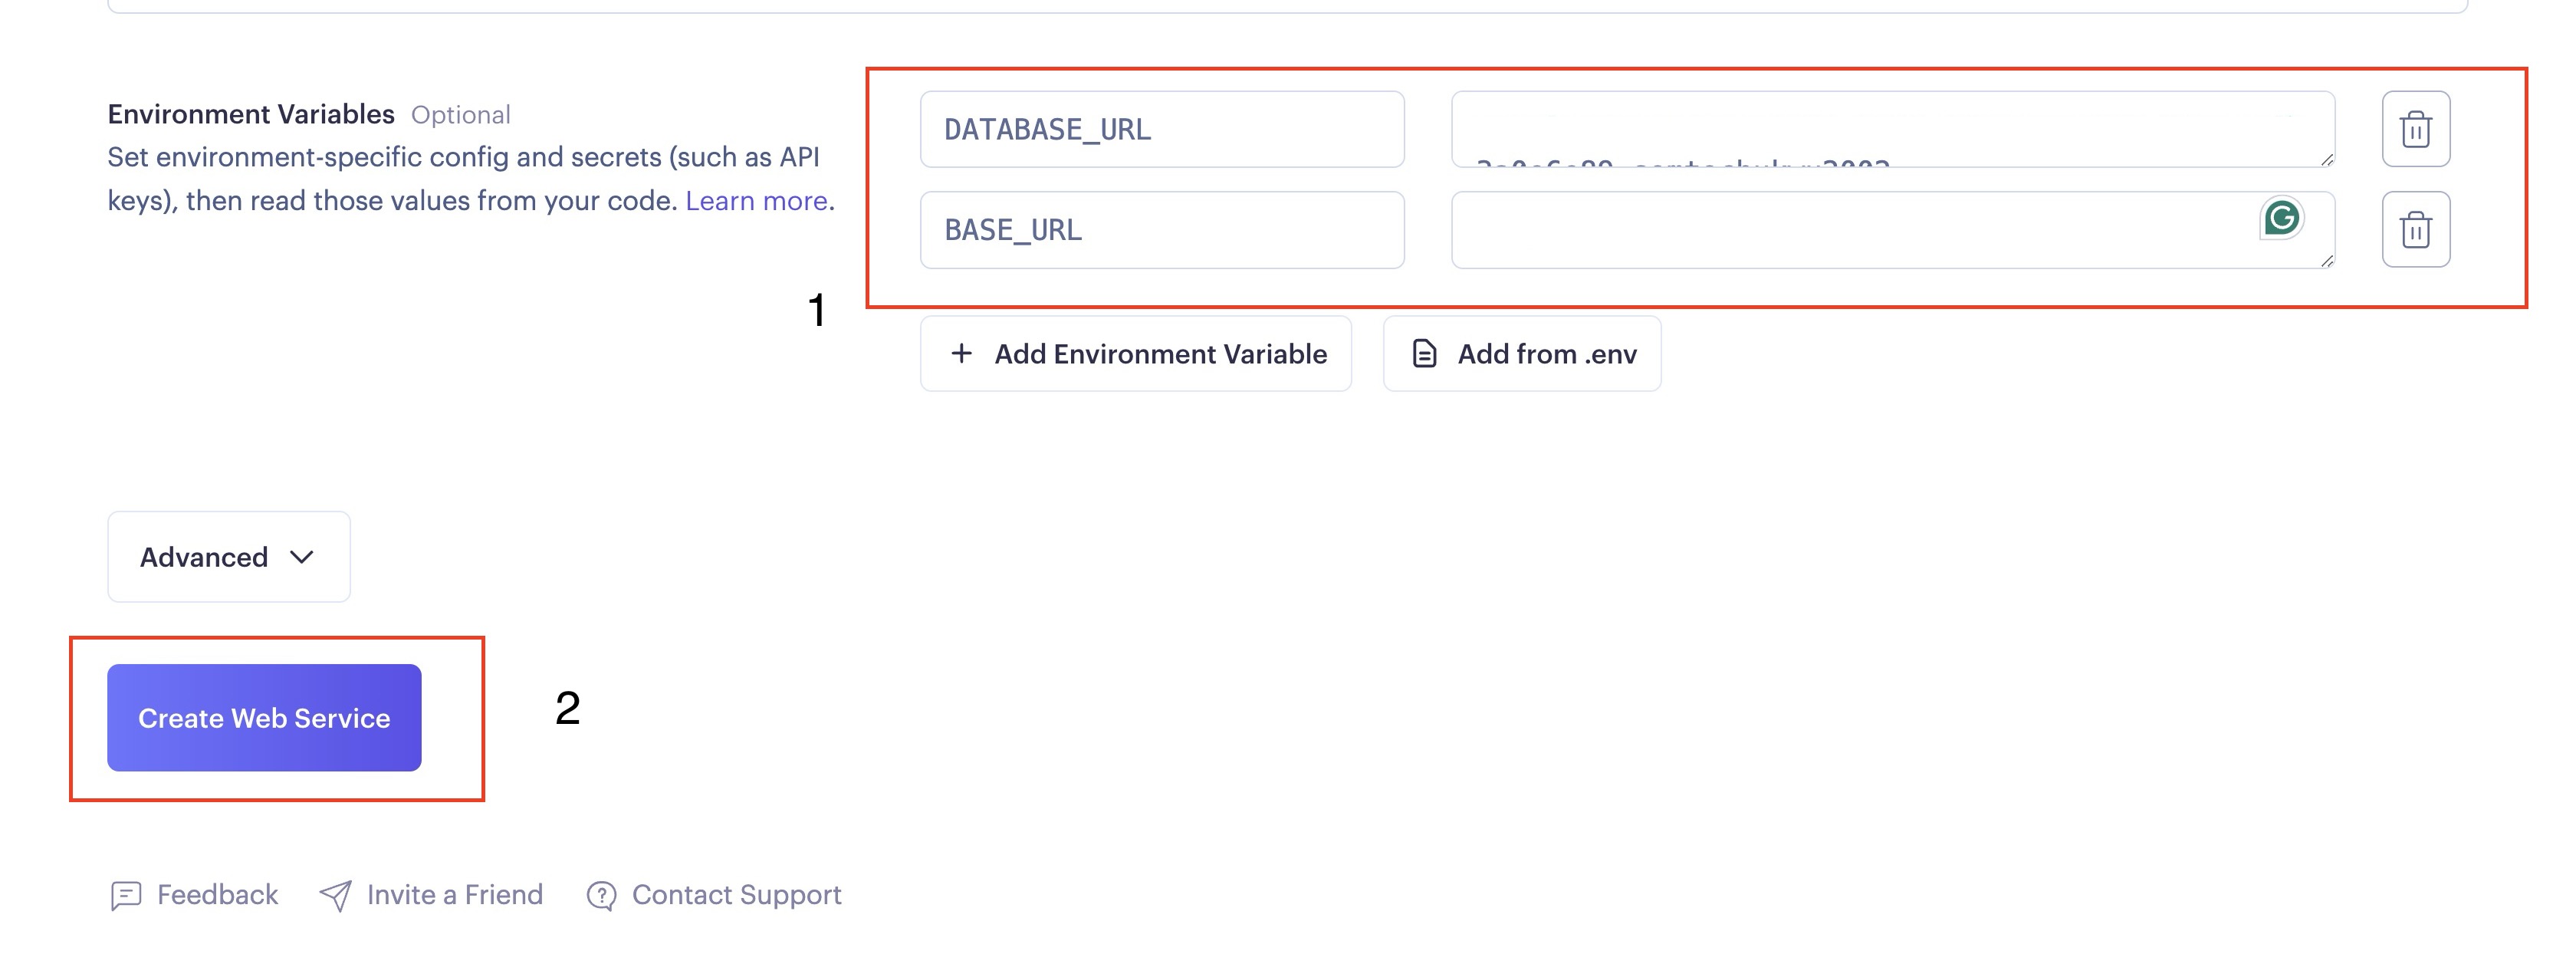
Next, scroll down, fill in your environmental variables, and click the “Create Web Service” button, as shown in the image below:
Clicking the “Create Web Service” button will take you to the deployment page, where you can monitor the deployment process through the logs, as shown in the image below.
After a while, you should get a log saying, “Your service is live 🎉”. You can access the live version of your service using the URL provided by Render on the top left corner of your screen, as shown in the image below.

The default domain assigned by Render is too long for a URL shortener; be sure to add your short custom domain to your web application before using it publicly. After changing your default domain to your custom domain, be sure to update the value to your BASE_URL in your environmental variables to match your new domain.
Conclusion
In this article, you learned how a URL shortener works, how to build it using the fast JavaScript runtime known as Bun, and how to deploy it on Render using Docker.
You can test your application using an API testing tool like cURL or Insomnia. Alternatively, you can build a UI for your URL shortener to make it easier for users to interact with it.
Scale Seamlessly with OpenReplay Cloud
Maximize front-end efficiency with OpenReplay Cloud: Session replay, performance monitoring and issue resolution, all with the simplicity of a cloud-based service.